Your AC won’t start. The outdoor unit hums but won’t kick on. Or maybe it runs for a few minutes, then shuts off. You call a technician, and they mention the word “capacitor.” Now you’re Googling: What does AC capacitor failure cost? Is this a real problem or an upsell?
An AC capacitor stores and releases electrical energy to start your compressor and fan motor. When it fails, your system won’t start, hums loudly, or cycles erratically. Capacitor replacement typically costs $150–$400 installed, depending on capacitor type (single vs. dual), labor, and emergency service timing. Ignoring a bad capacitor forces your compressor to work harder, risking a $2,000+ compressor failure or full system replacement.
In Arizona’s 110°F summers, a failed capacitor isn’t just an inconvenience: it’s a comfort crisis. But it’s also one of the most straightforward HVAC repairs when diagnosed correctly. This guide walks you through what a capacitor does, how to spot failure, what replacement costs, and when a $300 repair saves you from a $10,000 system replacement. You’ll get transparent pricing, clear diagnostic steps, and red flags that indicate your AC needs professional attention so you can make an informed decision, not a panicked one.
What Is an AC Capacitor and What Does It Do?
Think of your AC capacitor as the battery that jump-starts your compressor and fan motor every time your thermostat calls for cooling. It stores electrical energy and releases it in a quick burst to overcome the inertia of starting a heavy motor. Without that boost, your compressor can’t generate the torque needed to begin the refrigeration cycle.
Capacitors don’t provide continuous power. They deliver a high-voltage jolt at startup, then either step back (start capacitors) or continue providing a smaller voltage boost to keep the motor running efficiently (run capacitors). Most residential AC systems use one of three configurations: a start capacitor, a run capacitor, or a dual capacitor that combines both functions in a single cylindrical component.
Start Capacitor vs. Run Capacitor vs. Dual Capacitor
A start capacitor delivers a high-energy pulse (typically 70–250 microfarads) to kick the compressor motor into motion, then disconnects from the circuit once the motor reaches operating speed. These are common in older or larger systems where the compressor needs extra starting torque.
A run capacitor (typically 5–80 microfarads) stays in the circuit while the motor runs, improving efficiency and reducing electrical stress. It’s found in both compressor and fan motor circuits and is the most common failure point because it operates continuously during cooling cycles.
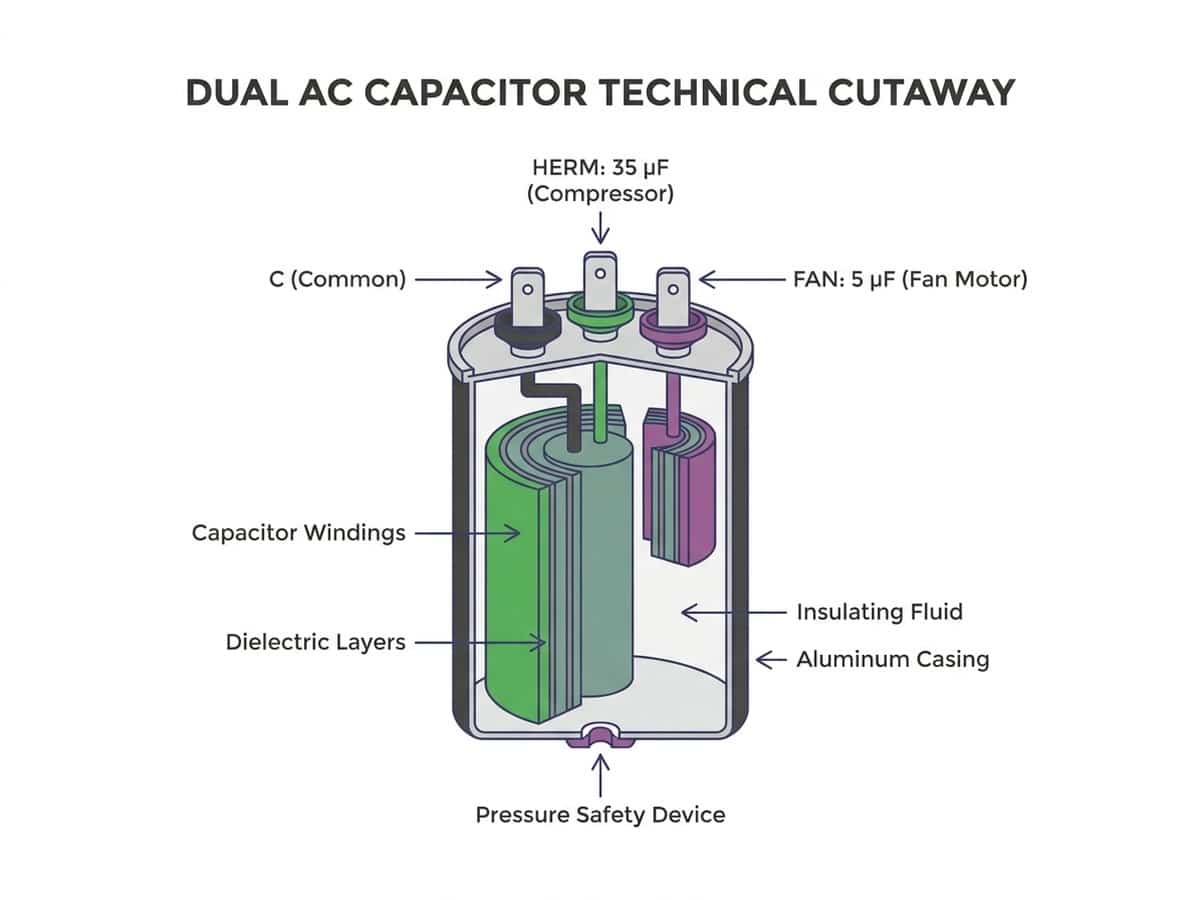
A dual capacitor combines start and run functions in a single canister with three terminals: one for the compressor, one for the fan motor, and a common terminal. Most modern residential AC systems use dual capacitors because they’re compact, cost-effective, and simplify wiring. When a dual capacitor fails, both the compressor and fan motor lose their electrical boost, which is why your outdoor unit might hum (compressor trying to start) but the fan blade doesn’t spin.
According to the EPA, extreme ambient temperatures accelerate the degradation of electrical components in refrigeration and air conditioning systems. In Arizona’s East Valley, where outdoor units routinely operate in 110°F–120°F conditions, capacitors face thermal stress that shortens their lifespan compared to milder climates.
Signs Your AC Capacitor Is Failing
A failing capacitor announces itself through a handful of unmistakable symptoms. If you notice any of the following, the capacitor is the first component a technician will test:
AC won’t start or takes several tries to kick on. The compressor needs that initial voltage jolt to overcome startup resistance. When the capacitor weakens, the compressor can’t generate enough torque. You might hear a clicking sound from the contactor (the electrical relay that powers the compressor), but the unit never fully starts. In some cases, the system will attempt to start, fail, wait a few minutes, then try again.
Humming or buzzing noise from the outdoor unit. This is the compressor trying to start without sufficient electrical boost. The motor is energized but can’t overcome mechanical resistance, so it hums loudly while drawing excessive amperage. If you hear this sound for more than a few seconds, turn the system off at the breaker to prevent compressor damage.
System shuts off randomly or short-cycles. A weak run capacitor can’t sustain the motor through a full cooling cycle. The compressor starts, runs for 30 seconds to 2 minutes, then shuts down due to electrical overload or thermal protection. This on-off cycling wastes energy, strains the compressor, and leaves your home unevenly cooled.
AC runs but doesn’t cool effectively. When the run capacitor fails in the fan motor circuit, the outdoor fan slows or stops while the compressor continues running. Without airflow across the condenser coils, the system can’t reject heat efficiently. Refrigerant pressure climbs, cooling capacity drops, and the compressor eventually overheats. If your AC runs but delivers warm air, check whether the outdoor fan blade is spinning.
Burning smell or visible bulging/leaking on the capacitor. Capacitors are filled with dielectric oil. When they overheat or experience electrical stress, the oil can leak, the casing can bulge, or you might smell a distinct acrid odor (similar to burning electronics). Any visible deformation or oily residue on the capacitor is a definitive failure signal. In some cases, a capacitor may vent internally with a small popping sound.
ENERGY STAR recommends annual professional maintenance to inspect electrical connections, clean coils, and test components like capacitors, reducing the likelihood of mid-season breakdowns. Capacitor testing takes less than a minute with a multimeter, and catching a weak capacitor during a spring tune-up prevents a no-start crisis in July.
If you’re seeing multiple symptoms, the capacitor is almost certainly the culprit. But capacitors aren’t always the problem; other issues can mimic capacitor failure. For other reasons your AC isn’t cooling effectively, a proper diagnostic includes testing the contactor, checking refrigerant charge, and verifying compressor health.
What Causes AC Capacitors to Fail?
Capacitors are wear items, not lifetime components. They fail predictably due to heat, electrical stress, and age. Understanding the causes helps you prevent premature failure and recognize when replacement is inevitable.
Heat and Electrical Stress
Every time your AC cycles on, the capacitor delivers a high-voltage pulse. That electrical discharge generates heat. In Arizona, the capacitor sits inside an outdoor condenser unit that routinely reaches 130°F–140°F in direct sun. The combination of ambient heat and electrical stress degrades the dielectric oil and capacitor windings over time.
Capacitors have a temperature rating (typically 70°C or 85°C). When ambient conditions exceed that rating for extended periods, the capacitor’s internal chemistry breaks down faster. You’ll notice this most often in systems that run 10–12 hours per day during peak summer: the continuous duty cycle accelerates wear.
Age and Duty Cycle
Capacitors typically last 10–20 years under normal operating conditions. But “normal” doesn’t apply in the East Valley. A system that runs 8+ hours daily in 110°F heat experiences a duty cycle far beyond the manufacturer’s baseline assumption (which is often modeled on milder climates with shorter cooling seasons). According to the U.S. Department of Energy’s residential HVAC literature review, proper maintenance and timely component replacement are among the most effective ways to extend system lifespan and avoid costly failures. In practice, many Arizona capacitors fail at the 7–10 year mark.
High-efficiency systems with variable-speed compressors tend to cycle less frequently, which can extend capacitor life. Single-stage systems that run at full capacity every time they start put more stress on the start capacitor. If your system is original to your home and hasn’t had a capacitor replacement in 8+ years, it’s statistically due.
Power Surges and Voltage Irregularities
Monsoon storms bring lightning strikes and grid fluctuations. A nearby lightning strike can send a voltage spike through your electrical panel, overwhelming the capacitor’s dielectric insulation. Even without direct strikes, voltage sags and surges from the grid (especially during peak demand) stress electrical components.
Most AC systems lack integrated surge protection. Installing a whole-home surge protector at your electrical panel adds a layer of defense, but it won’t eliminate all risk. If you’ve experienced a power outage or storm recently and your AC won’t start afterward, suspect capacitor damage.
In our 3,000+ installs and thousands of service calls across the East Valley, we’ve seen capacitor failure as one of the top three causes of no-start AC issues during peak summer.
How Much Does AC Capacitor Replacement Cost?
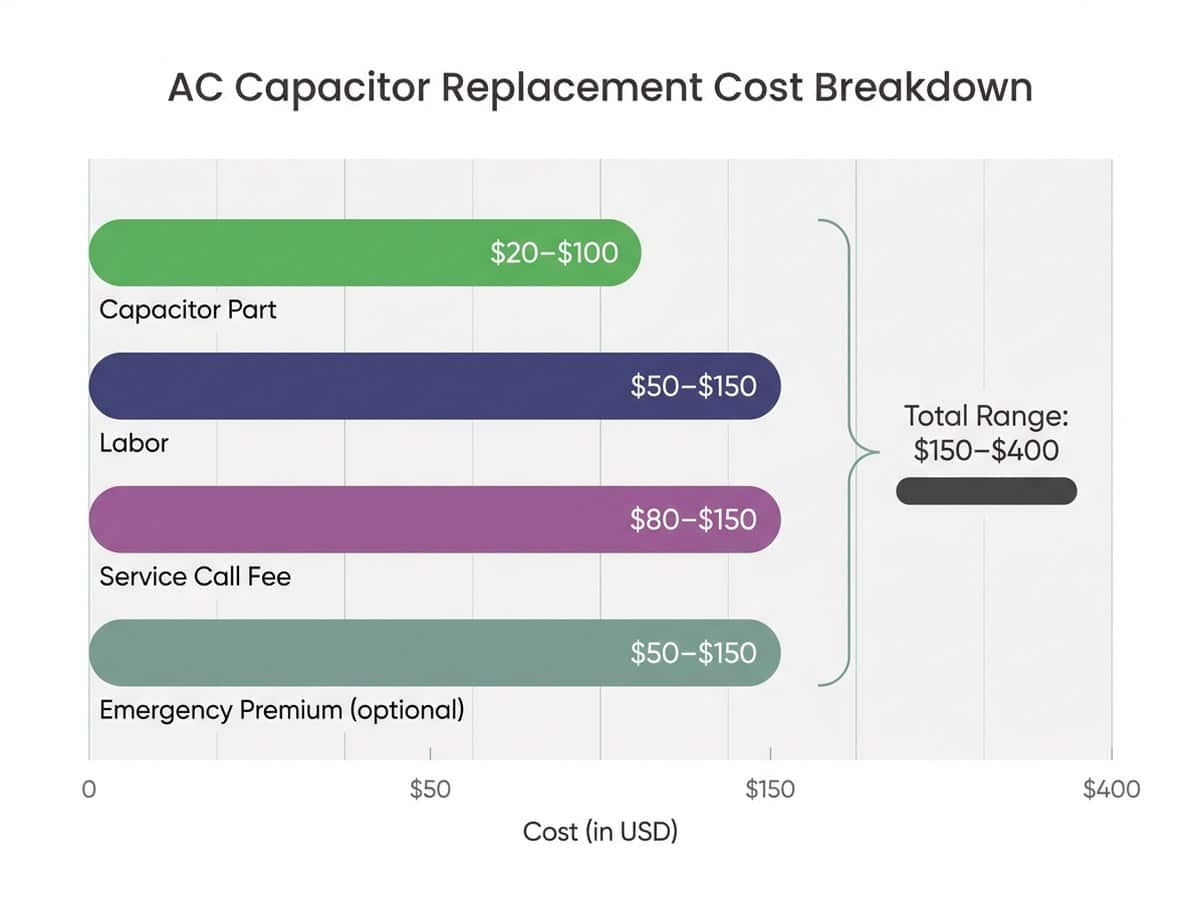
Capacitor replacement typically costs $150–$400 installed, with most homeowners paying $250–$350 for same-day service from a licensed technician. The price includes the capacitor itself, labor, system testing, and a service call fee. Let’s break down what drives the variance.
Capacitor Part Cost vs. Labor Cost
The capacitor is inexpensive. A quality dual capacitor (the most common type in residential AC systems) costs $20–$100 wholesale, depending on microfarad rating and brand. Single start capacitors and single run capacitors sit at the lower end ($20–$50), while oversized dual capacitors for larger systems (4-ton or 5-ton units) can reach $80–$100.
Labor and service call fees make up the bulk of the invoice. A licensed HVAC technician charges $80–$150 for the service call (trip charge), plus $50–$150 for labor (typically a flat-rate job, since capacitor replacement takes 15–30 minutes once diagnosed). You’re paying for:
- Diagnostic testing to confirm the capacitor is the problem (not the contactor, compressor, or wiring)
- Safe discharge of the old capacitor’s stored electrical charge
- Removal and replacement with the correct microfarad-rated part
- System testing to verify the compressor and fan motor start properly
- Safety inspection of related electrical components (contactor, disconnect, wiring)
Single vs. Dual Capacitor Pricing
A single run capacitor replacement (if your system uses separate start and run capacitors) costs $150–$250 installed. A dual capacitor replacement costs $200–$350 installed because the part is slightly more expensive and the technician must verify proper terminal connections for both the compressor and fan motor.
Some older systems use a start capacitor plus a separate run capacitor for the compressor, and another run capacitor for the fan motor (three total capacitors). In those cases, replacing all three at once can push the total to $350–$500, but it’s rare to see three-capacitor configurations in systems installed after 2005.
Emergency Service vs. Scheduled Repair
If your AC dies at 9 PM on a Saturday and you need 24/7 emergency AC repair with same-day dispatch, expect to pay a premium. Emergency service fees typically add $50–$150 to the base cost. A $250 daytime repair becomes $300–$400 after-hours.
Scheduled service during business hours (next-business-day or within 24 hours) eliminates the emergency premium. If your AC is still limping along or you catch the problem during a tune-up, you’ll pay the lower end of the range.
What’s Included in the Service Call
A professional capacitor replacement includes more than swapping a part. You’re also paying for:
- Free on-site diagnostic: The technician tests voltage, amperage, and capacitance to confirm the capacitor is the issue (not a bad contactor, compressor lockup, or wiring fault).
- Transparent upfront quote: You approve the price before work begins. Our no-hidden-fees guarantee on all AC repairs means the quote you receive is the invoice you pay. No surprise charges for “extra labor” or “diagnostic time.”
- Warranty on parts and labor: Most reputable contractors offer a 1-year labor warranty and a manufacturer’s warranty on the capacitor (typically 1–5 years depending on brand).
- Safety inspection: The technician checks contactor condition, tightens electrical connections, and verifies proper refrigerant pressures while the system is open.
If a company quotes you $500+ for a basic capacitor replacement (no other repairs), ask for a detailed breakdown. The part itself is never more than $100, so you’re either paying for emergency service, a compressor diagnostic, or being overcharged.
The EPA’s phase-out of R-22 refrigerant means older systems face higher repair costs and limited parts availability, often making replacement more economical than a repair. If your system still uses R-22 and the capacitor is failing, it’s worth asking whether a full system upgrade makes more financial sense than a repair.
Can You Replace an AC Capacitor Yourself?
Technically, yes. Capacitors are sold at HVAC supply houses and online. The mechanical replacement is straightforward: disconnect power, discharge the old capacitor, disconnect the wires, install the new capacitor with matching microfarad ratings, reconnect the wires, restore power. A handy homeowner with basic electrical knowledge can complete the task in 20 minutes.
But “can you” and “should you” are different questions. Capacitor replacement carries real electrical hazards, and a misdiagnosis wastes money on a part that wasn’t the problem.
The Risks of DIY Capacitor Replacement
Electrocution hazard. Capacitors store electrical charge even after you shut off the breaker. A dual capacitor can hold up to 370 volts for hours. If you touch the terminals without discharging the capacitor first (using an insulated screwdriver to short the terminals), you can receive a severe shock. This isn’t a minor zap: it’s enough to cause cardiac arrhythmia or muscle spasms that throw you off a ladder.
Misdiagnosis. A failed capacitor and a failed contactor produce nearly identical symptoms (humming, no start). So do a locked compressor, bad wiring, and a faulty thermostat. If you replace the capacitor and the system still doesn’t start, you’ve spent $50–$100 on a part you didn’t need. A licensed technician tests voltage, amperage, and capacitance before replacing anything, which eliminates guesswork.
Wrong capacitor specification. Capacitors are rated in microfarads (µF) and voltage. Installing a capacitor with the wrong microfarad rating (even by 5 µF) can cause the motor to draw excessive current, overheat, or fail prematurely. The voltage rating must also match or exceed the system’s requirements. A generic “universal capacitor” from a big-box store may not match your system’s exact specs.
Voided equipment warranty. Most AC manufacturers void the compressor warranty if a non-licensed technician performs electrical work. If your system is less than 10 years old and still under warranty, a DIY capacitor replacement could cost you thousands in future compressor coverage.
If you’re not 100% certain of the diagnosis, if the system is under warranty, or if you lack electrical training, the safer and smarter choice is to call a professional. The cost difference between DIY ($50 part + your time + risk) and professional service ($250–$350 installed with warranty) is small relative to the risk of injury or misdiagnosis.
When to Call a Professional
Call a licensed HVAC technician if:
- You’re not comfortable working with high-voltage electrical components.
- The system is under warranty (manufacturer or labor).
- You’re unsure whether the capacitor is the actual problem.
- The capacitor is visibly damaged (bulging, leaking, burned terminals). This often indicates a deeper electrical fault.
- You’ve replaced the capacitor and the system still won’t start (the problem is elsewhere).
According to a 2025 home service trends report, 68% of homeowners expect same-day or next-day service for urgent HVAC issues, particularly during peak cooling season. A professional diagnostic takes 10–15 minutes, gives you certainty about the repair, and often uncovers related issues (dirty coils, loose wiring, weak contactor) that would have caused a second service call if ignored.
For issues beyond the capacitor, when to repair vs. replace a failing compressor becomes the next decision point, and that’s a diagnosis best left to a technician who can test amp draw, refrigerant pressures, and compressor windings.
When Should You Replace the Whole AC Unit Instead of Just the Capacitor?
A $300 capacitor replacement is a smart fix if your system is relatively young and healthy. But if the capacitor failure is a symptom of a dying system, you might be throwing money at a problem that will cascade into bigger repairs within 12–24 months. Here’s how to decide.
Age of the System
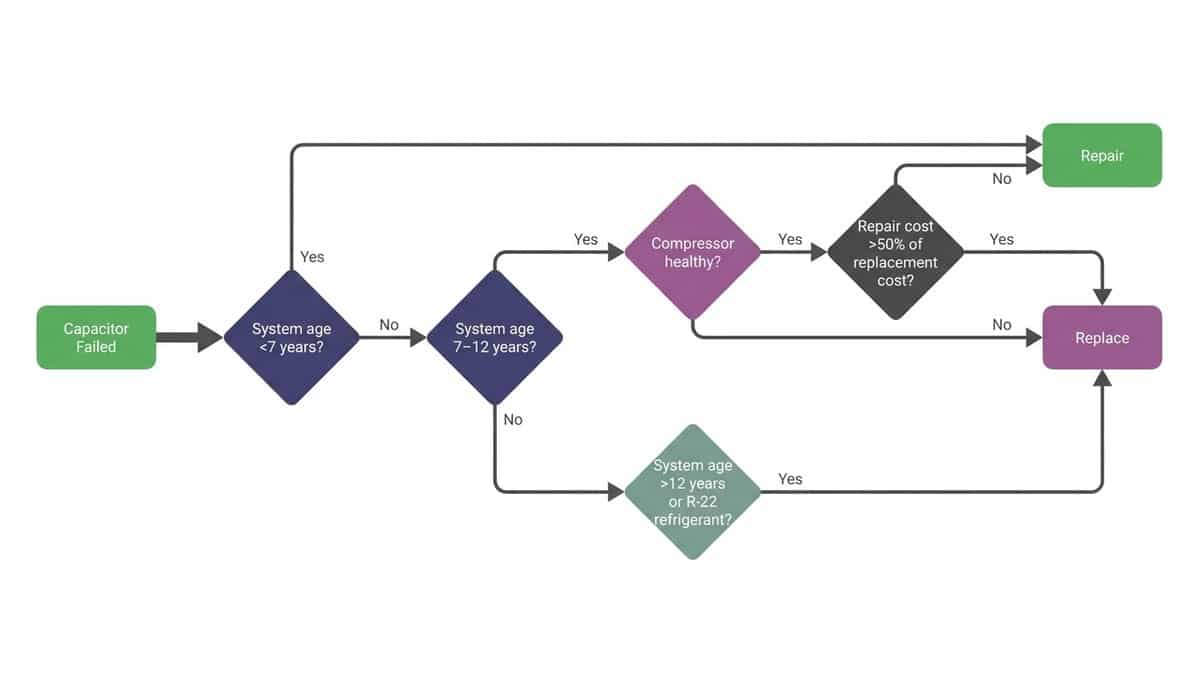
If your AC is 10+ years old and still uses R-22 refrigerant, replacement often makes more sense than repair. R-22 is no longer manufactured (EPA phase-out completed in 2020), so topping off refrigerant costs $100–$150 per pound (vs. $50–$75 per pound for modern R-410A). If you’re facing a capacitor replacement today and a refrigerant leak next summer, you’ll pay $300 now and $800–$1,500 later: half the cost of a new system.
Systems installed before 2010 also run at lower SEER (Seasonal Energy Efficiency Ratio) ratings, typically 10–13 SEER. A modern high-efficiency system (16–20 SEER) can cut your cooling costs by 30–40%, which offsets the replacement investment over 5–7 years.
If your system is less than 7 years old, capacitor replacement is a no-brainer. Between 7–12 years, the decision hinges on repair history and compressor health. After 12 years, every repair is a calculated risk.
Compressor Health
The capacitor helps the compressor start, but it can’t fix a compressor that’s mechanically failing. If the technician tests the capacitor and finds it weak, but also measures high amp draw on the compressor (indicating worn bearings or refrigerant system issues), you’re looking at a compressor replacement ($2,000–$3,500) in addition to the capacitor.
At that point, replacing the entire outdoor unit (compressor, condenser coils, fan motor, capacitor, contactor, everything) costs $3,500–$6,000 installed, which is only marginally more than a compressor-only replacement and gives you a completely new system with a 10-year parts warranty.
Repair Cost vs. Replacement Cost
Use the 50% rule: if the repair cost exceeds 50% of the replacement cost and the system is over 10 years old, replace rather than repair.
Example: Your 12-year-old AC needs a capacitor ($300) and the technician finds a refrigerant leak that will cost $800 to repair and recharge. Total repair: $1,100. A new 3-ton system costs $5,000–$6,500 installed. $1,100 is less than 50% of replacement cost, so the repair is justifiable, if you don’t expect another major expense in the next 2 years.
But if the system has had multiple repairs in the past 24 months (capacitor, contactor, blower motor, coil leak), each repair is a gamble. At some point, you’re funding an old system that will fail again. For a detailed framework on this decision, see deciding between AC repair and full system replacement.
Upgrading to a high-efficiency system also unlocks long-term savings. The long-term savings of a high-efficiency AC system often justify the upfront cost, especially if you plan to stay in your home for 5+ years and your current system runs inefficiently.
How to Prevent Capacitor Failure (and Extend Your AC’s Lifespan)
You can’t eliminate capacitor wear, but you can slow it down and catch problems early. These five steps reduce electrical stress, improve system efficiency, and give you years of warning before a catastrophic failure.
Annual maintenance tune-ups. A spring tune-up includes capacitor testing (measuring microfarad rating and voltage), contactor inspection, coil cleaning, and refrigerant pressure verification. Technicians use a multimeter to test capacitance; a reading below the rated value by 10% or more signals a weak capacitor that should be replaced proactively. Catching it during a scheduled service call costs less than an emergency replacement in July. How preventive maintenance reduces emergency repair costs is a simple math equation: a $150 tune-up prevents a $400 emergency service call.
Surge protection installation. A whole-home surge protector at your electrical panel ($300–$600 installed) defends against voltage spikes from lightning strikes and grid fluctuations. It won’t stop normal capacitor aging, but it eliminates sudden failures caused by electrical surges, the single most preventable cause of premature capacitor death.
Air filter replacement every 60–90 days. A clogged filter forces the blower motor to work harder, which increases electrical load on the run capacitor. It also restricts airflow, causing the compressor to run longer cycles to achieve the same cooling. Both effects accelerate capacitor wear. Indoor air quality matters beyond just comfort: choosing the right air filter based on MERV ratings protects both your health and your equipment. A $5 filter change every 2–3 months is the simplest maintenance task you can do.
Thermostat habits. Avoid extreme setpoint swings (e.g., setting the thermostat to 65°F after leaving it at 85°F all day). The compressor and fan motor will cycle on and off more frequently as the system works to close the temperature gap, stressing the start capacitor. A programmable or smart thermostat that adjusts gradually reduces cycling frequency.
Professional diagnostics at first sign of trouble. Don’t ignore a humming outdoor unit or a system that takes multiple tries to start. These are early warnings. A capacitor doesn’t fail instantly; it weakens over weeks or months. Testing it early gives you time to schedule a repair at your convenience, rather than waiting until it dies completely on the hottest day of the year.
Why Choose JLM for Capacitor Replacement in the East Valley
When your AC won’t start and it’s 110°F outside, you need a technician who shows up fast, diagnoses accurately, and charges transparently. That’s where JLM separates from corporate franchises and out-of-town contractors.
Transparent pricing, no hidden fees. We give you an upfront quote before we touch a wrench. The price you approve is the price you pay. No “diagnostic fees” added after the fact, no mysterious “trip charges,” no upsells for parts you don’t need. If it’s just a capacitor, we replace the capacitor. If the system has deeper issues, we explain what’s wrong, what it costs to fix, and what happens if you wait. You make the call.
Same-day and emergency availability. We dispatch 24/7, including weekends and holidays. Most capacitor replacements are completed same-day, often within 2–4 hours of your call. You’re not waiting until Monday or “the next available appointment.” If your AC dies at 9 PM on Saturday, we’re answering the phone and sending a truck. Fast, honest AC repair in Gilbert isn’t a marketing line: it’s how we built 3,000+ installs and an A+ BBB rating.
A+ BBB rating and 3,000+ installs. We’ve replaced thousands of capacitors, diagnosed hundreds of no-start systems, and installed 3,000+ complete AC systems across the East Valley. That experience means we catch problems other techs miss (a weak contactor that would have failed in 6 months, a refrigerant leak that explains why the capacitor wore out early, wiring issues from a previous install). You’re not getting a first-year apprentice learning on your system: you’re getting a licensed technician who’s seen this exact failure pattern a hundred times.
Owner-led service. Bill is licensed, on the job, and accessible. This isn’t a franchise call center where you’re routed to the “next available tech.” When you call JLM, you’re talking to people who live in Queen Creek, Gilbert, and Apache Junction. We service our neighbors’ homes, and we see you at the grocery store. That accountability drives the honesty and quality that keeps customers calling us back (and referring their family).
Maintenance plan enrollment. After we replace your capacitor, we’ll offer enrollment in a maintenance plan that includes annual tune-ups, priority scheduling, and discounted service calls. It’s optional, not required, but it’s the smartest way to prevent the next failure. We test capacitors, contactors, and refrigerant levels every spring, so you’re not guessing when something is about to break.
Indoor air quality systems are another layer of protection for your equipment and your health. For families concerned about Arizona’s dust and allergens, whole home air purifiers provide comprehensive filtration, while whole house air filtration systems offer advanced protection from dust and allergens by reducing the particulate load on your HVAC system.
Frequently Asked Questions About AC Capacitor Failure
How long does an AC capacitor last? Capacitors typically last 10–20 years under normal operating conditions, but Arizona’s extreme heat and high duty cycles often shorten lifespan to 7–12 years. Systems that run 8+ hours daily in 110°F weather stress capacitors faster than manufacturer baselines assume.
Can a bad capacitor damage my compressor? Yes. A weak capacitor forces the compressor to draw higher amperage during startup, which overheats the motor windings and accelerates wear. A failed capacitor can also cause the compressor to hum without starting, leading to thermal overload and internal damage. Replacing a $300 capacitor prevents a $2,000+ compressor failure.
What’s the difference between a start capacitor and a run capacitor? A start capacitor delivers a high-voltage jolt (70–250 microfarads) to kick the compressor into motion, then disconnects. A run capacitor (5–80 microfarads) stays in the circuit while the motor runs, improving efficiency. Most residential systems use a dual capacitor that combines both functions.
How do I know if my capacitor is bad or if it’s another problem? A multimeter test measures capacitance (microfarad rating) and voltage. A reading 10% or more below the rated value indicates a weak capacitor. But similar symptoms (humming, no start) can be caused by a bad contactor, locked compressor, or wiring fault. Professional diagnostics eliminate guesswork and confirm the exact failure point.
Will my AC work at all with a bad capacitor? It depends. If the run capacitor fails but the start capacitor is functional, the compressor may start but run inefficiently and overheat. If the start capacitor fails, the compressor won’t start at all: you’ll hear humming but no cooling. If a dual capacitor fails completely, neither the compressor nor the fan motor will run.
Is capacitor replacement covered by warranty? Capacitors are typically covered under the manufacturer’s parts warranty for 1–5 years, depending on brand. Labor warranties vary by contractor (JLM offers a 1-year labor warranty on all repairs). If your system is over 5 years old, the capacitor is likely out of parts warranty, but replacement is inexpensive enough that warranty coverage is rarely a deciding factor.
Conclusion: Don’t Wait. A $300 Fix Beats a $10,000 Replacement
A failed AC capacitor is one of the most common, most predictable, and most affordable HVAC repairs. It’s also one of the most urgent in Arizona’s summer heat. Ignoring the warning signs (humming, delayed starts, short cycling) doesn’t make the problem go away: it forces your compressor to work under electrical stress, which leads to a catastrophic failure that costs 10 times more to fix.
The average capacitor replacement costs $250–$350 installed and takes less than an hour once diagnosed. It’s a straightforward repair with a clear cost and a reliable outcome. But it requires accurate diagnostics, proper electrical safety, and a technician who’s honest about what your system needs. If you’re being quoted $500+ for a basic capacitor swap (no other repairs), you’re either paying for emergency service or being overcharged.
According to Market Research Intelo’s HVAC repair services market analysis, timely component replacement and preventive maintenance are key drivers of system longevity and customer satisfaction. When your AC won’t start and you need answers today (not a voicemail promising a callback “within 24–48 hours”), call a team that lives in your community, has replaced thousands of capacitors, and backs every job with transparent pricing and an A+ BBB rating.
Call now: 602-619-3609 for same-day diagnostics and transparent pricing. No hidden fees. No upsells. Just honest answers and quality work from a family-owned team that lives in your community.
By JLM Air Conditioning & Heating Team