When your furnace isn’t heating, start with the thermostat (check mode and batteries), then inspect the air filter, circuit breaker, and pilot light or ignition system. If the furnace runs but produces no warm air, or if you smell gas or see error codes, stop and call a licensed HVAC technician immediately.
It’s 7pm on a chilly Arizona evening. The thermostat says 72°F, but your house feels like 60. The kids are complaining, your partner is pulling out extra blankets, and you’re staring at a silent furnace wondering whether this is a quick fix or an expensive service call.
The good news: many furnace failures trace back to simple issues you can resolve yourself in under 10 minutes. The better news: when it’s something more serious, knowing when to stop and call a professional saves you time, money, and potential safety hazards. This guide walks you through safe DIY checks first, then tells you exactly when it’s time to contact an HVAC professional across Gilbert, Queen Creek, Mesa, and Apache Junction.
Whether you’re dealing with a thermostat glitch or a failed ignitor, you’ll finish this guide knowing the next right step.
Why Your Furnace Stopped Heating
Most furnace failures boil down to five common root causes: thermostat misconfiguration, clogged air filters, power supply interruptions, ignition system malfunctions, or blower motor issues. According to Rheem’s 2024 HVAC Trends and Regulations Report, preventable heating problems account for a significant portion of emergency service calls during winter months.
Understanding which component failed helps you decide whether to grab a screwdriver or pick up the phone. The troubleshooting checklist in the next section walks through each possibility in order of likelihood, starting with the easiest fixes first.
In our years of service across Gilbert, Queen Creek, Mesa, and Apache Junction, we’ve completed over 3,000 installations and performed thousands of furnace repairs. Our service data shows that approximately 60% of winter heating failures trace back to a clogged air filter or a thermostat set to ‘Cool’ instead of ‘Heat’. These are issues you can resolve yourself in under 10 minutes, which is why we always recommend checking the basics before scheduling a service call.
Thermostat Issues
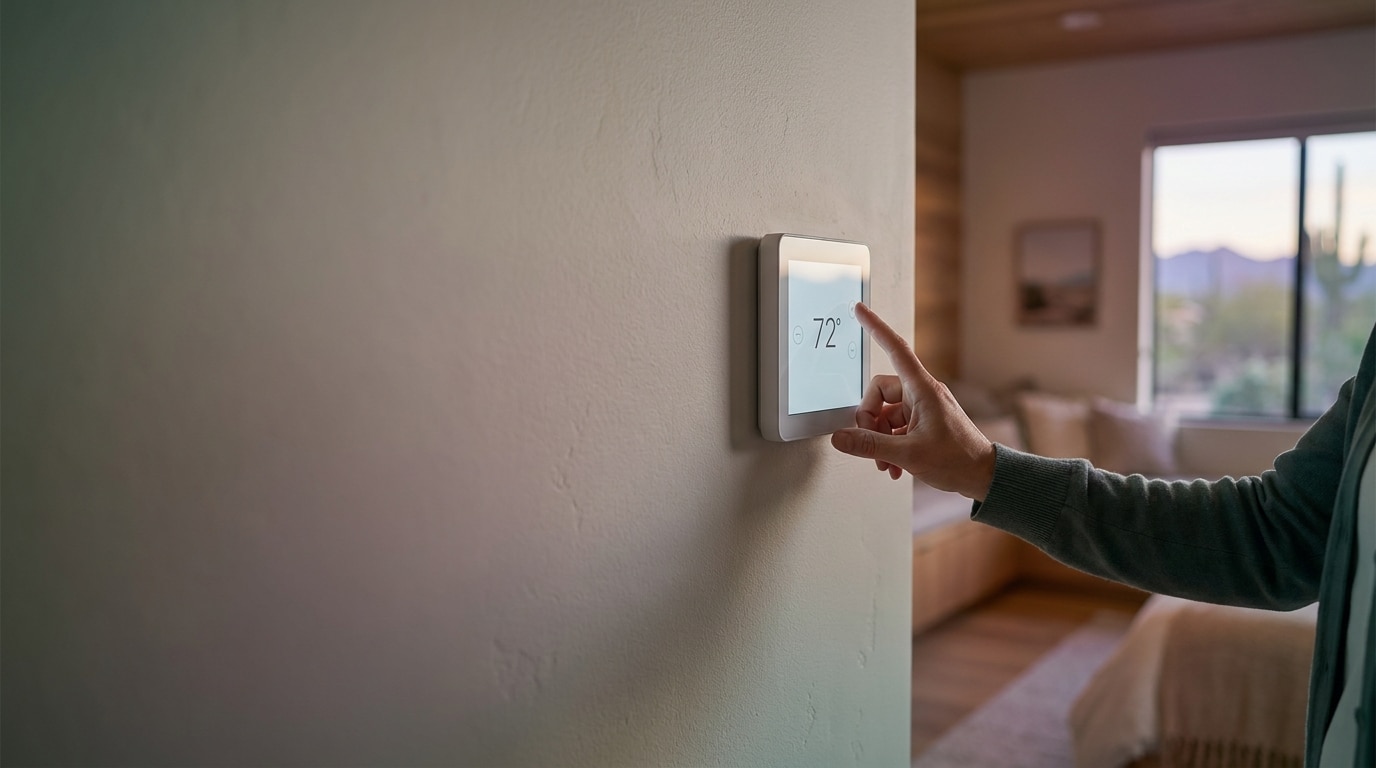
Your thermostat acts as the command center for your heating system. If it’s set to the wrong mode, has dead batteries, or isn’t communicating properly with the furnace, nothing else matters. The furnace won’t even attempt to heat.
Common thermostat problems include: being switched to ‘Cool’ or ‘Off’ instead of ‘Heat’, batteries dying in battery-powered models, loose wiring connections at the wall plate, or the temperature setting being lower than the current room temperature. Modern programmable thermostats can also fail if their internal schedule overrides your manual adjustments.
Check the display screen. If it’s blank or dim, replace the batteries first. If the screen shows a temperature setting below your desired comfort level, adjust it up by 5 degrees and listen for the furnace to kick on. Simple fixes solve most thermostat-related heating failures.
Dirty or Clogged Air Filter
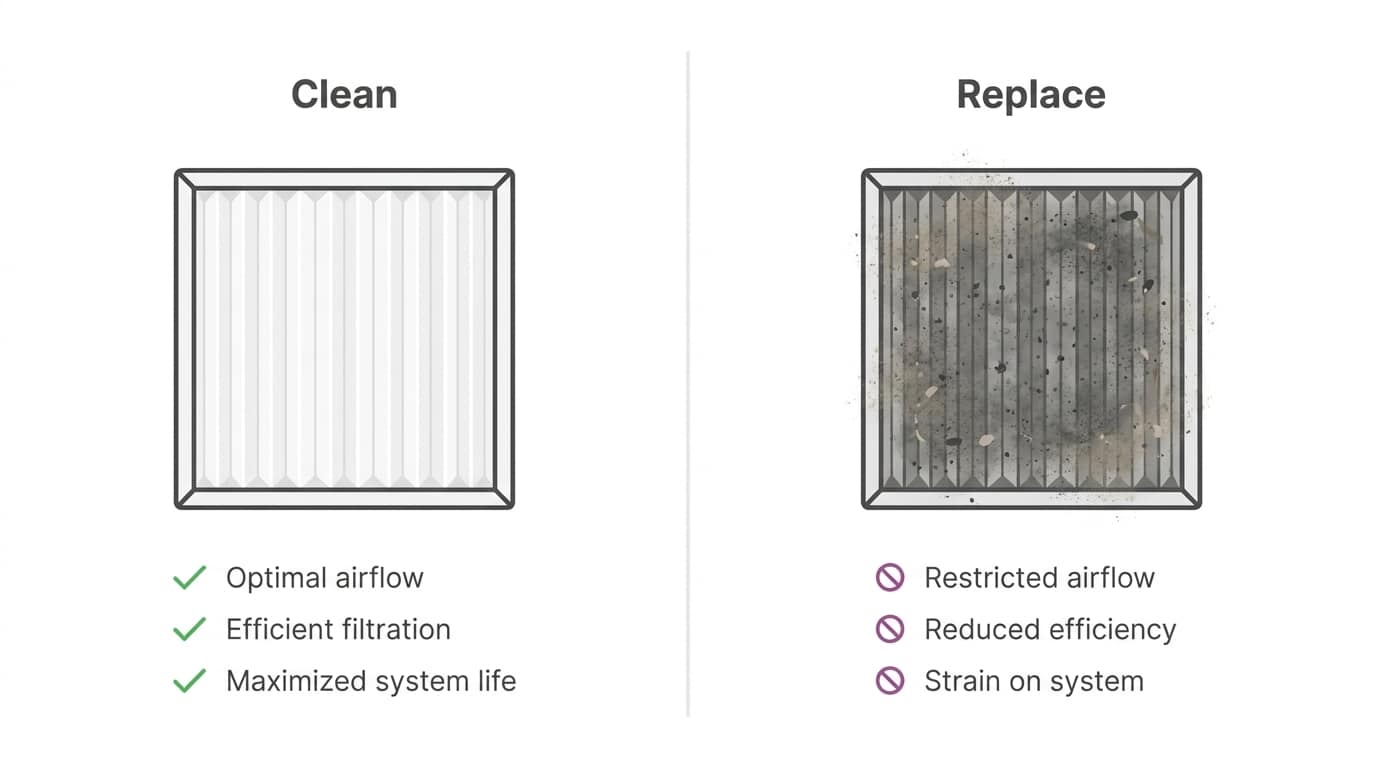
A clogged air filter restricts airflow through your HVAC system, forcing the furnace to work harder while delivering less heat. When airflow drops too low, safety switches can shut down the heating cycle entirely to prevent overheating.
The U.S. Department of Energy’s 2018 Residential HVAC Literature Review identifies dirty filters as a leading cause of system inefficiency and premature equipment failure. Filters accumulate dust, pet hair, and debris over time. In Arizona’s dusty climate, filters clog faster than national averages suggest.
Check your filter every month during heating season. If you can’t see light through it when you hold it up to a window, it’s time for a replacement. Standard filters cost $5 to $15 at any hardware store and take 30 seconds to swap out.
Step-by-Step Troubleshooting Checklist
Work through these steps in order. Each check takes 5 minutes or less. If one step solves the problem, stop there. If you reach Step 4 and still have no heat, it’s time to call a professional.
Step 1: Check the Thermostat Settings
Walk to your thermostat and verify these four settings:
Mode switch: Confirm it’s set to ‘Heat’, not ‘Cool’ or ‘Off’. This is the single most common oversight we encounter on service calls.
Temperature setting: Make sure the target temperature is at least 5 degrees higher than the current room temperature shown on the display. If your house reads 62°F and the thermostat is set to 68°F, the furnace should be running.
Fan setting: Set the fan to ‘Auto’, not ‘On’. When set to ‘On’, the fan runs continuously but the furnace only heats during heating cycles. This can create the illusion of airflow without warmth.
Battery check: If your thermostat uses batteries (most modern programmable models do), replace them annually or whenever the low-battery icon appears. Dead batteries prevent the thermostat from sending signals to the furnace.
According to Federal Trade Commission consumer guidance on home heating and cooling, proper thermostat management is one of the top two actions homeowners can take to reduce heating costs and prevent system failures. If adjusting these settings triggers the furnace to start, let it run for 10 minutes and feel the air coming from your vents. It should be noticeably warm.
Step 2: Inspect and Replace the Air Filter
Locate your furnace’s air filter. Most filters sit in a slot between the return air duct and the furnace cabinet, or inside the furnace cabinet door itself. Check your owner’s manual if you’re not sure where to look.
Pull out the filter and hold it up to a light source. If you can’t see light passing through the filter media, or if the surface is covered in a thick layer of dust and debris, replace it immediately.
Standard 1-inch pleated filters should be replaced every 30 to 90 days during heating season, depending on household dust levels and whether you have pets. Arizona’s desert environment and seasonal dust storms accelerate filter clogging, so check monthly rather than waiting the full 90 days.
Installing a new filter takes 30 seconds: slide out the old filter, note the airflow direction arrow printed on the frame, and slide in the new filter with the arrow pointing toward the furnace. Close the cabinet door or slot cover. Turn the furnace back on and listen for the blower to start.
Regular filter changes are the single most cost-effective maintenance task you can perform. For ongoing air conditioning maintenance and year-round system health, we recommend setting a monthly calendar reminder.
Step 3: Verify Power to the Furnace
Furnaces require electrical power even when they burn natural gas. A tripped circuit breaker or a switched-off power switch can leave the furnace completely non-functional.
Check the circuit breaker: Open your home’s electrical panel and locate the breaker labeled ‘Furnace’ or ‘HVAC’. If it’s in the ‘Off’ or middle position, flip it fully off, then back on. Listen for the furnace to attempt a startup sequence.
Check the furnace power switch: Most furnaces have a wall-mounted power switch located near the unit, often resembling a standard light switch. Someone may have accidentally turned it off. Make sure it’s in the ‘On’ position.
Check the furnace door: Many furnaces have a safety interlock switch that prevents operation when the access door is open or improperly seated. Push the door firmly closed until you hear it latch.
If the breaker trips again immediately after you reset it, stop and call a licensed technician. Repeated breaker trips indicate a short circuit, failed component, or dangerous electrical fault that requires professional diagnosis.
Step 4: Examine the Pilot Light or Ignition System
Older furnaces use a standing pilot light. Newer models use electronic ignition systems. Both can fail, preventing the furnace from generating heat even when everything else functions correctly.
For pilot-light furnaces: Look through the viewing window (usually a small glass or metal panel on the furnace cabinet). You should see a small blue flame burning continuously. If the pilot is out, consult your owner’s manual for relighting instructions. Most manufacturers provide step-by-step guidance on a label inside the cabinet door.
Safety warning: If you smell gas when you open the furnace cabinet, leave the house immediately and call your gas utility provider or 911. Do not attempt to relight the pilot yourself.
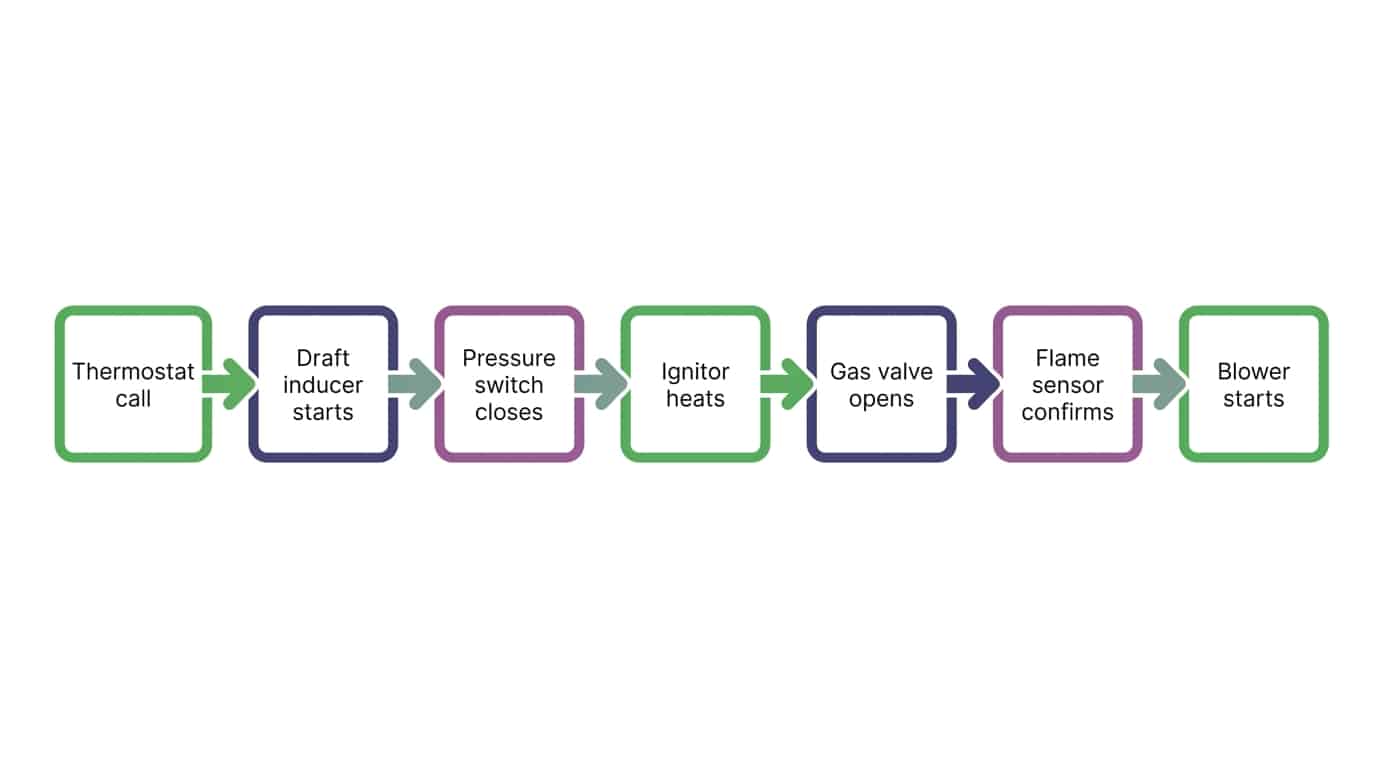
For electronic-ignition furnaces: You’ll hear a clicking sound or see a brief glow when the furnace attempts to ignite. If you hear clicking but see no flame, or if the furnace shuts down after 30 seconds, the ignitor or flame sensor may have failed.
Ignitor failure is the most common heating repair we perform. It’s a $150 to $250 fix that takes about an hour, yet some companies will push a $10,000 system replacement on the spot. We don’t do that. If your ignition system fails, you need a new ignitor or flame sensor, not a new furnace.
When to Stop and Call a Pro
Some furnace problems sit beyond the safe reach of DIY troubleshooting. Attempting repairs on gas-burning appliances, electrical systems, or refrigerant lines without proper training creates serious safety risks. Here’s when to stop and call a licensed HVAC technician.
Gas Smell or Visible Flame Irregularities
Natural gas has a distinctive sulfur or “rotten egg” odor added as a safety measure. If you smell gas anywhere near your furnace, leave your home immediately and call 911 or your gas utility’s emergency line from outside.
Do not attempt to locate the leak. Do not turn any lights on or off. Do not use your phone inside the house. Even a small spark can ignite accumulated gas.
If you see flames that are yellow, orange, or flickering irregularly (instead of a steady blue), the burner may have a dangerous combustion problem. Shut off the furnace at the thermostat and the power switch, then call for service. Incomplete combustion produces carbon monoxide, an odorless gas that can be fatal.
Persistent Error Codes or Lockouts
Modern furnaces have built-in diagnostic systems that display error codes when something goes wrong. These codes (usually a series of flashing lights or a numeric display) tell technicians exactly which component failed.
If your furnace displays an error code and won’t reset after you’ve followed the troubleshooting steps above, it has entered “lockout mode” to prevent damage. Common lockout triggers include flame sensor failures, pressure switch problems, or ignition sequence failures.
Write down the error code, then call a professional. Technicians certified through organizations like the Air Conditioning Contractors of America follow industry diagnostic standards to identify the failed component and explain your repair options clearly. Attempting to bypass safety lockouts by repeatedly resetting the furnace can cause expensive secondary damage.
Furnace Cycles On and Off Rapidly
If your furnace starts, runs for 30 seconds to 2 minutes, then shuts down before the house warms up, it’s “short-cycling”. This pattern indicates a safety control is shutting the system down prematurely.
Common short-cycle causes include dirty flame sensors (easy professional cleaning), failed limit switches (safety component that prevents overheating), or undersized ductwork creating excessive back pressure. All require professional diagnosis.
Short-cycling wastes energy, prevents your home from warming properly, and accelerates wear on expensive components like the blower motor and control board. Just as summer AC failures demand urgent attention, winter heating problems deserve prompt professional service to prevent minor issues from cascading into major repairs.
When you reach this point, the DIY troubleshooting checklist has done its job. You’ve eliminated the simple fixes, identified symptoms a technician needs to hear, and saved yourself from attempting unsafe repairs. That’s exactly what this guide is designed to help you do.
What to Expect from a Professional Furnace Repair
Calling for furnace repair doesn’t mean you’re locked into an expensive replacement or mysterious charges. Understanding the diagnostic process, typical repair costs, and what separates honest service from high-pressure sales helps you make confident decisions.
Diagnostic Process
A professional furnace diagnostic visit follows a structured sequence. The technician will start by asking what symptoms you’ve observed (no heat, intermittent operation, strange noises, error codes). This conversation establishes baseline information and helps narrow the problem.
Next comes visual inspection. The technician examines the furnace cabinet, ductwork connections, electrical wiring, gas line connections, and exhaust venting for obvious issues like loose wires, disconnected ducts, or blocked vents.
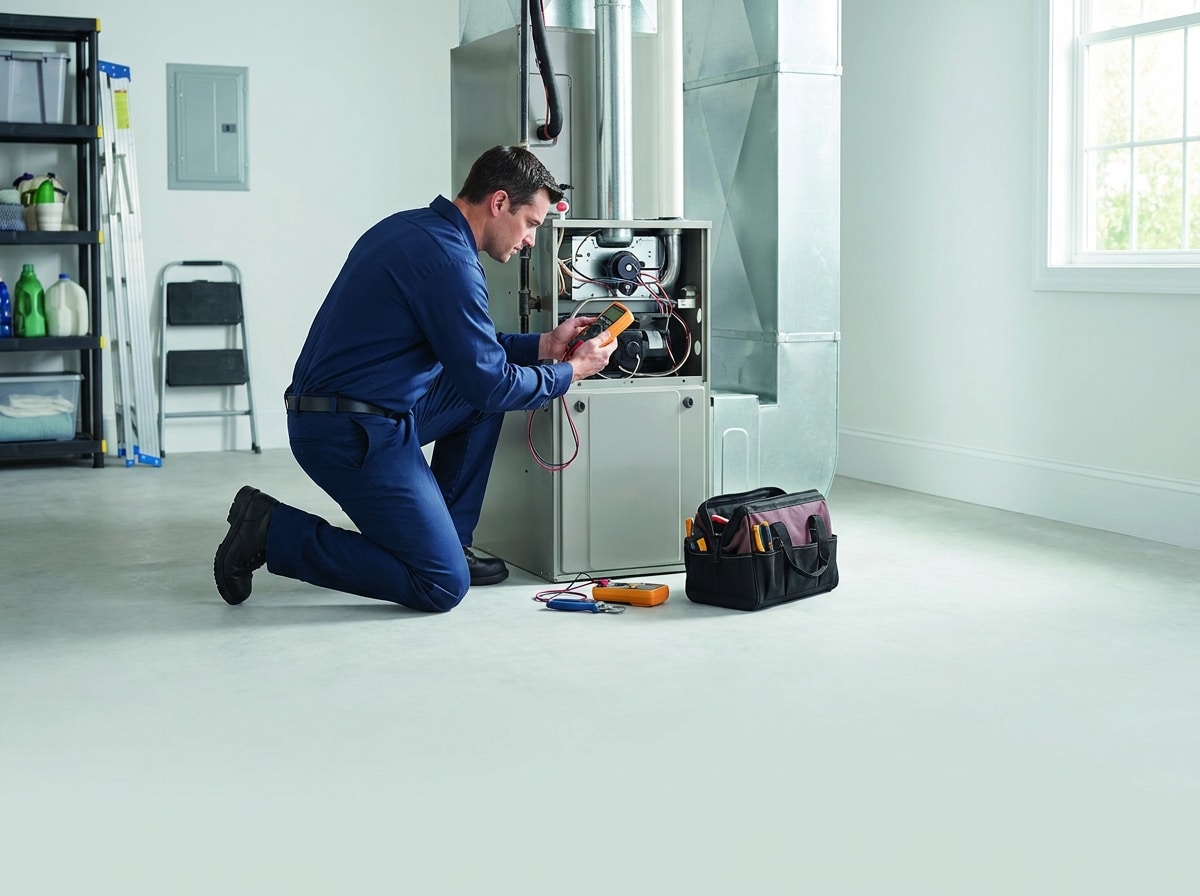
Then comes functional testing. The technician will cycle the furnace through its startup sequence, measuring voltage at key components, checking gas pressure, observing flame characteristics, and monitoring temperature rise across the heat exchanger. Modern diagnostic tools (multimeters, combustion analyzers, manometers) provide objective data about system performance.
Finally, the technician explains findings in plain language. According to industry certification standards, licensed HVAC professionals should communicate what’s broken, why it failed, what repair or replacement options exist, and what each option costs. You should never feel pressured into an immediate decision on major repairs.
At JLM, we perform this full diagnostic sequence on every service call. You get a written estimate before we start any repair work, and we explain why each recommended repair matters for safety, efficiency, or system longevity.
Common Repairs and Ballpark Costs
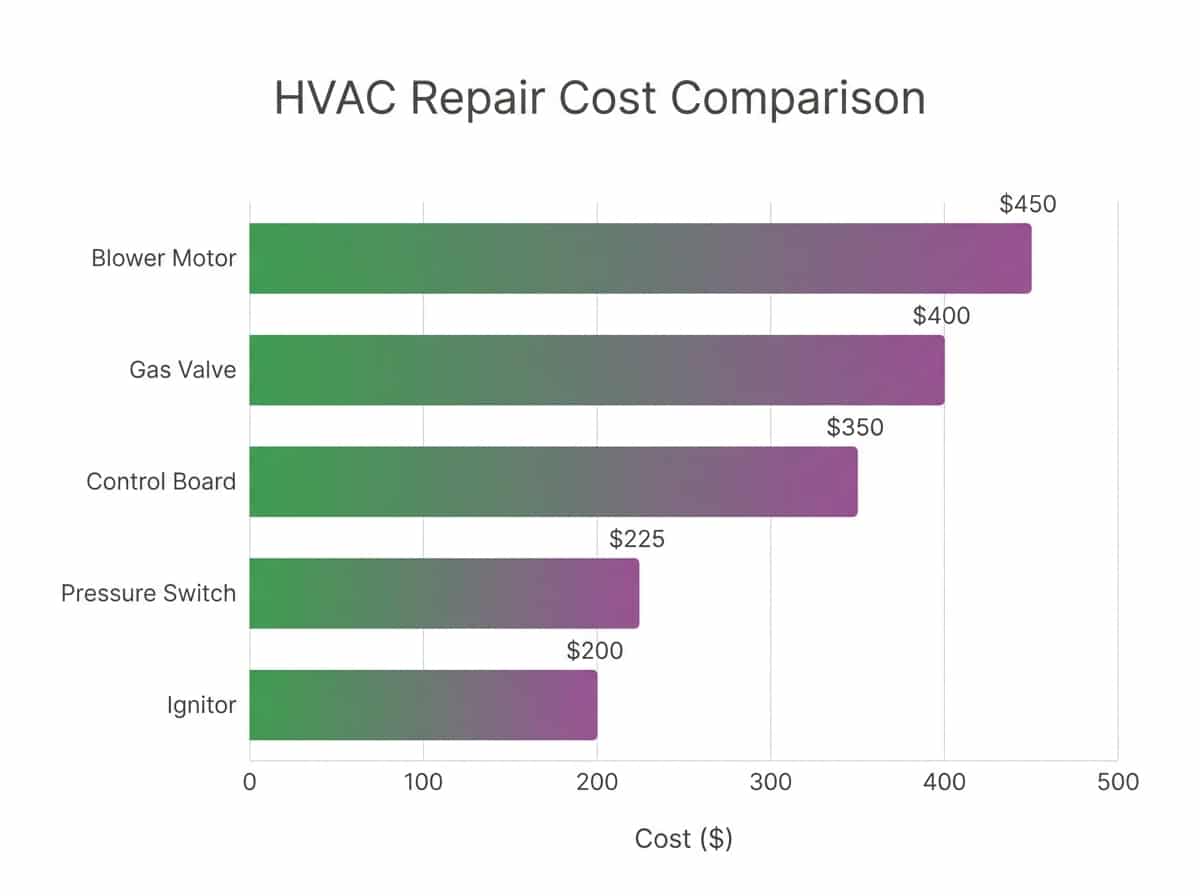
Most furnace repairs fall into a handful of predictable categories. Understanding typical costs helps you evaluate whether a quote is fair or inflated.
Ignitor replacement: $150 to $300. Hot surface ignitors and flame sensors are wear items that fail after 5 to 10 years of use. Replacement takes 30 to 60 minutes.
Blower motor repair or replacement: $250 to $600. Blower motors circulate heated air through your ductwork. Motor bearings wear out, capacitors fail, or windings burn out. A simple capacitor swap costs $150 to $200. Full motor replacement runs $400 to $600.
Gas valve replacement: $300 to $500. Gas valves control fuel flow to the burners. When they fail, the furnace won’t ignite or will produce weak flames. Replacement requires gas line work and combustion testing.
Control board replacement: $200 to $500. Circuit boards (the furnace’s computer) can fail due to power surges, moisture, or age. Symptoms include erratic behavior, failure to start, or persistent error codes.
Pressure switch replacement: $150 to $300. Pressure switches verify that the draft inducer is pulling combustion gases safely out of the heat exchanger. Failed switches prevent ignition as a safety measure.
These costs are national averages and vary by brand, furnace age, and regional labor rates. Always ask for a written estimate before authorizing repairs. Be wary of any company that quotes a repair cost over the phone without seeing the furnace first.
How JLM Approaches Furnace Repairs
We built JLM Air Conditioning & Heating on a simple principle: fix what’s truly needed, not what generates the highest invoice. When you call us for furnace repair, owner Bill Milbourn is often the technician who shows up at your door. You’re talking directly to the decision-maker, not a commissioned salesperson following a corporate script.
Our diagnostic visit includes full system testing, written findings, and transparent pricing. If we find that a $200 ignitor replacement solves your heating problem, that’s exactly what we recommend. We won’t suggest a $10,000 furnace replacement unless the heat exchanger is cracked, the system is dangerously inefficient, or repair costs exceed 50% of replacement value.
We also back our work with clear warranties. Parts and labor are covered, and we provide follow-up support if you have questions after the repair. Our A+ BBB rating and referral-driven growth prove that honest service builds long-term relationships. We live in the East Valley, serve neighbors in Gilbert, Queen Creek, Mesa, and Apache Junction, and stake our reputation on every service call.
Preventing Future Furnace Problems
Reactive repairs cost more and create more stress than proactive maintenance. Catching small problems before they escalate into emergency failures saves money, extends equipment life, and keeps your family comfortable through Arizona’s coldest nights.
Annual Maintenance Plans
Professional furnace tune-ups catch developing problems early. During a maintenance visit, a technician cleans the burners and flame sensor, tests the ignition system, checks gas pressure and combustion efficiency, inspects the heat exchanger for cracks, lubricates the blower motor, tightens electrical connections, and verifies that safety controls function correctly.
The Federal Trade Commission’s consumer guidance on home heating costs identifies annual professional maintenance as one of the most cost-effective actions homeowners can take to reduce energy bills and prevent breakdowns. A well-maintained furnace runs 10% to 15% more efficiently than a neglected one, and the inspection often reveals minor issues (a $50 capacitor replacement) before they cascade into major failures (a $500 blower motor burnout).
JLM offers annual maintenance plans that cover both heating and cooling systems. Members receive priority scheduling, discounted service rates, and annual tune-ups timed to prepare your AC for Gilbert’s hot summer. It’s the simplest way to protect your investment and avoid emergency calls at the worst possible times.
Seasonal Pre-Winter Checks
Even if you don’t schedule professional maintenance, you can perform basic pre-winter checks yourself. Start in October, before nighttime temperatures drop into the 50s.
Replace the air filter. Start the heating season with a fresh filter. Mark your calendar to check it monthly through March.
Test the thermostat. Set the thermostat to ‘Heat’ and raise the temperature 5 degrees above current room temperature. Listen for the furnace to start within 60 seconds. Feel the air coming from the vents after 5 minutes. It should be noticeably warm.
Clear combustion air vents. Walk outside and locate your furnace’s intake and exhaust vents (usually two white PVC pipes protruding from an exterior wall). Make sure they’re not blocked by leaves, debris, or stored items. Blocked vents trigger safety shutdowns.
Check carbon monoxide detectors. Replace batteries in all CO detectors and test them. Furnaces are the most common source of household carbon monoxide. Working detectors are non-negotiable.
Inspect ductwork in accessible areas. Look for visible gaps, disconnected sections, or crushed ducts in your attic, garage, or crawl space. Leaky ducts waste heated air and reduce system efficiency.
These checks take 30 minutes and cost nothing beyond a filter replacement. They prevent the majority of preventable furnace failures and give you peace of mind before winter arrives.
For homeowners interested in year-round air conditioning services beyond furnace-specific maintenance, our team provides comprehensive system inspections that address both heating and cooling equipment. Arizona’s climate demands reliable performance from both sides of your HVAC system, and integrated maintenance plans ensure neither gets neglected.
Conclusion
A furnace that won’t heat on a cold night is stressful, but it doesn’t have to be mysterious or expensive. Start with the troubleshooting checklist in this guide: check the thermostat settings, replace a dirty filter, verify power to the furnace, and inspect the ignition system. These steps solve the majority of heating failures and cost little or nothing to perform.
When DIY troubleshooting reaches its safe limit (gas smells, error codes, short-cycling), calling a licensed HVAC professional is the smart move. You’ll get a proper diagnosis, transparent repair options, and the peace of mind that comes from knowing the job was done safely and correctly.
At JLM Air Conditioning & Heating, we’ve spent years building trust with East Valley families by doing exactly what we say we’ll do: show up on time, diagnose the problem honestly, fix what’s needed, and stand behind our work. Our A+ BBB rating, owner-led service model, and track record reflect our commitment to quality over shortcuts.
Whether you’re troubleshooting a furnace issue or considering mini split installation options for specific heating zones, understanding your system empowers you to make confident decisions.
For homeowners exploring alternative heating solutions in smaller spaces, garage AC options demonstrate the versatility of modern HVAC technology. Similarly, mini split installation in Gilbert provides zoned comfort control that traditional furnaces can’t match.
Before emergency situations arise, familiarize yourself with the signs that professional AC repair becomes necessary. The same diagnostic principles apply across all HVAC systems.
Stay informed about HVAC best practices, seasonal maintenance tips, and local service updates through our library of HVAC troubleshooting guides. Knowledge empowers you to make confident decisions about your home comfort systems.
Finally, early-season tune-ups for Arizona’s climate apply equally to heating and cooling equipment. Spring maintenance prepares your AC; fall maintenance prepares your furnace.
Furnace still not heating after you’ve checked the basics? Don’t wait in the cold.
JLM Air Conditioning & Heating offers same-day furnace repair across Gilbert, Queen Creek, Mesa, and Apache Junction with transparent pricing, no hidden fees, and an A+ BBB rating you can trust. Our team (led by owner Bill Milbourn) will diagnose the problem, explain your options honestly, and get your heat running fast.
Call now: (602) 619-3609 or schedule your furnace repair online today.
By the JLM Air Conditioning & Heating Team