If you’re bracing for the summer electric bill spike when your air conditioner runs around the clock in 110°F heat, you’re not alone. Air Conditioning Maintenance is the key to controlling costs without sacrificing comfort. Regular air conditioning maintenance can reduce your energy bills by 15–30% and extend your system’s lifespan. A dirty coil, clogged filter, or low refrigerant forces your AC to run longer and work harder, spiking electric costs. A professional tune-up (cleaning coils, checking refrigerant, calibrating the thermostat) restores efficiency and prevents expensive emergency breakdowns during Arizona’s hottest months. This guide walks you through exactly which maintenance tasks deliver measurable savings, what to tackle yourself, and when to call a licensed technician like JLM Air Conditioning & Heating.
Whether you live in Gilbert, Queen Creek, or Apache Junction, the Arizona cooling season puts unique strain on HVAC systems. Understanding how your system works (and what breaks down when you neglect it) is the first step toward cutting costs this summer. Let’s start with why your bill spikes in the first place.
Why Your AC Bill Spikes in Arizona Summers (and Why Maintenance Matters)
Arizona summers aren’t just hot. They’re relentless. When outdoor temperatures hit 115°F and your air conditioner runs continuously from May through September, even a small efficiency loss compounds into hundreds of dollars wasted.
The Arizona Heat Factor: 24/7 Cooling Season
Most parts of the country experience a cooling season measured in weeks. In the East Valley, you’re looking at four solid months of daily high temperatures above 105°F, with peak demand days topping 115°F. According to Salt River Project’s 2023 residential energy report, the average Gilbert household uses 2,500–3,500 kWh per month during peak summer, with air conditioning accounting for 50–70% of that total.
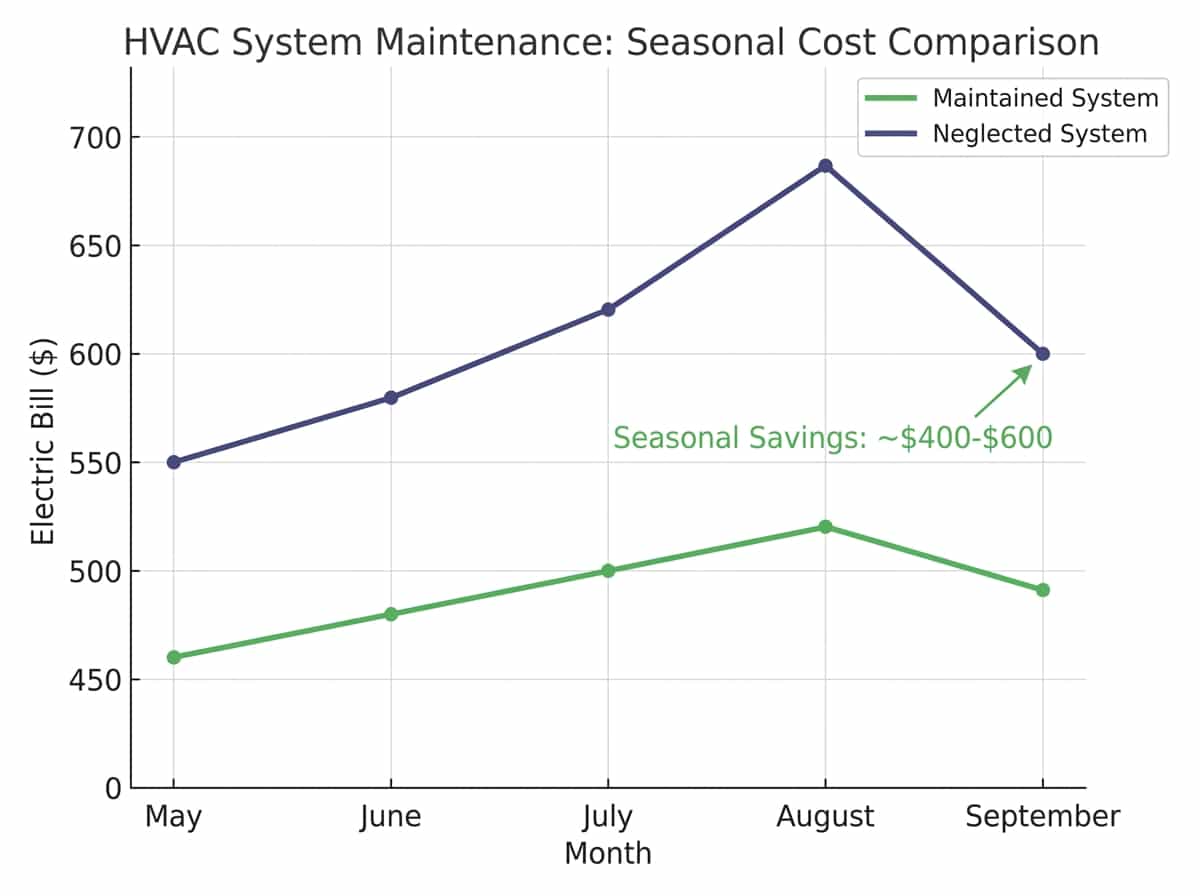
Your system doesn’t cycle on and off like it does in milder climates. It runs continuously, which means the compressor, blower motor, and refrigerant loop are under constant load. A system that’s 95% efficient in May will degrade to 85% by August if you skip maintenance. That 10% difference translates to roughly $100–$150 per month in wasted electricity for a typical 2,000-square-foot home. Over a four-month season, that’s $400–$600 thrown away because a $15 air filter wasn’t changed or coils weren’t cleaned.
The thermostat behavior changes, too. In cooler climates, your AC might cycle every 15–20 minutes. In Arizona summer heat, it’s running 20–22 hours a day. If your system is fighting against dirty coils, restricted airflow, or low refrigerant, it’s running even longer to reach the same setpoint, driving up runtime and costs simultaneously.
How Neglected Maintenance Destroys Efficiency
Every component in your HVAC system is engineered to transfer heat efficiently. When maintenance tasks are skipped, that efficiency erodes fast. Here’s what happens:
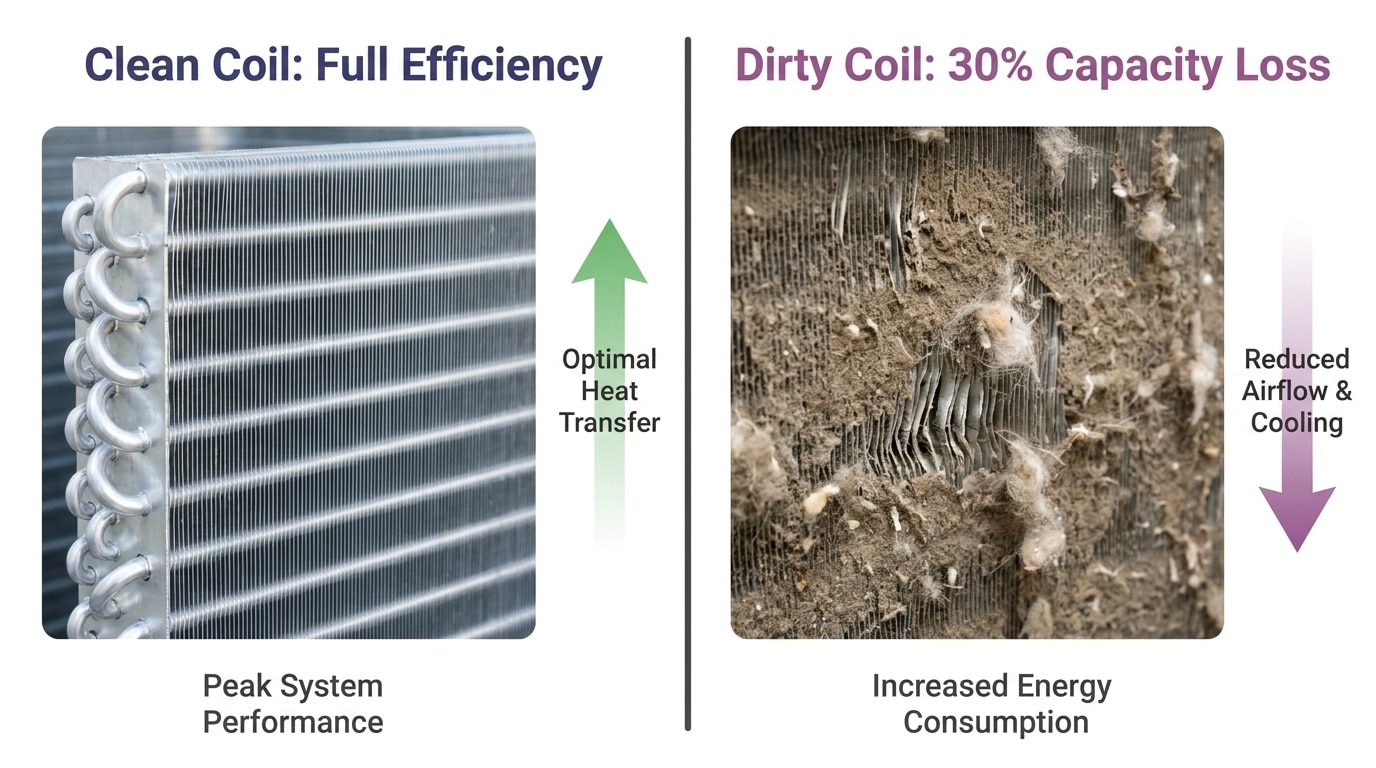
Dirty coils act as insulation. Your evaporator coil (inside) and condenser coil (outside) are designed to transfer heat between refrigerant and air. A layer of dust, pollen, or debris on the coil surface blocks that transfer. According to ASHRAE research published in 2021, dirty evaporator coils can reduce cooling efficiency by up to 30%. That means your compressor works 30% harder to deliver the same cooling output, burning electricity the entire time.
Clogged filters restrict airflow. A standard 1-inch pleated filter can trap 80–90% of dust and particulates when clean. After 30–60 days of Arizona dust, pollen, and continuous runtime, that filter is clogged. Restricted airflow forces the blower motor to work harder, increases static pressure in the duct system, and reduces heat transfer at the evaporator coil. The U.S. Department of Energy reports that replacing a dirty filter can improve efficiency by 5–15%. That’s $20–$60 per month in savings for a $15 part.
Low refrigerant causes freeze-ups and compressor damage. Refrigerant is the blood of your AC system. When the charge is low (due to a slow leak or improper installation), the evaporator coil gets too cold and ice forms on the refrigerant lines. Ice blocks airflow, efficiency drops, and your compressor runs hotter and longer. ACCA (Air Conditioning Contractors of America) technical standards indicate that a 10% refrigerant undercharge can reduce efficiency by 10–20%. Long-term, low refrigerant kills compressors, leading to a $2,000–$4,000 repair or full system replacement.
Miscalibrated thermostats add ghost runtime. If your thermostat is reading 2–3 degrees off, your AC runs longer than necessary. A thermostat that thinks it’s 80°F when the room is actually 77°F will keep the compressor running until it hits the false setpoint. Over a full day, that’s 2–4 extra hours of runtime you’re paying for with zero comfort benefit. Professional HVAC Services in the East Valley, AZ include thermostat calibration to eliminate this waste.
The takeaway? Maintenance isn’t optional in Arizona. It’s financial self-defense. A system running at 70% efficiency costs you 43% more per month than the same system at full capacity. The next section breaks down exactly which tasks deliver the biggest savings.
The 6 High-Impact Maintenance Tasks That Lower Your HVAC Bill
Not all maintenance tasks are created equal. Some deliver immediate, measurable savings. Others are important for safety and longevity but don’t move the needle on your electric bill. This section focuses on the six tasks that have the highest return on investment for cost-conscious East Valley homeowners.
1. Replace or Clean Air Filters Every 30–60 Days
Impact: 5–15% efficiency gain (U.S. Department of Energy data) DIY cost: $15–$40 per filter Frequency: Every 30 days during cooling season (May–September); every 60–90 days in winter
This is the single easiest and most cost-effective maintenance task you can perform. A clean filter allows maximum airflow across the evaporator coil, which means your blower motor works less and heat transfer is optimized. A clogged filter restricts airflow, causing the blower to pull more amperage, the coil to freeze, and the compressor to run longer.
How to do it right: Check your system’s filter size (typically printed on the existing filter frame: 16x25x1, 20x20x1, etc.). Buy pleated MERV 8–11 filters from a hardware store or online. Avoid MERV 13+ filters unless your system was specifically designed for high-efficiency filtration. The increased static pressure can damage residential blower motors.
During Arizona’s peak dust season (spring and summer), inspect the filter every 30 days. If it’s visibly gray or brown, replace it. If you have pets, smokers, or a dusty lot, you may need to replace filters every 20–30 days. Set a calendar reminder so you don’t forget.
Cost vs. savings: A quality pleated filter costs $15–$20. Replacing it monthly during the cooling season (five months) costs $75–$100. If dirty filters are costing you 10% in lost efficiency, that’s $50–$100 per month wasted on a typical $500 summer electric bill. The filter pays for itself in week one.
2. Clean Evaporator and Condenser Coils Annually
Impact: Up to 30% efficiency loss if coils are dirty (ASHRAE research, 2021) Service required: Professional (coil cleaning requires specialized tools and chemical agents) Typical cost: $150–$300 as part of annual tune-up
Your evaporator coil (located inside the air handler or furnace cabinet) and condenser coil (outside in the condensing unit) are heat exchangers. Dust, pollen, cottonwood seeds, and debris coat these coils over time, acting as insulation and blocking heat transfer. A dirty condenser coil in Arizona’s dusty environment can reduce system capacity by 20–30%, meaning your AC runs longer to cool the same space.
Why this is a pro job: Evaporator coils are deep inside the air handler and difficult to access without removing panels and potentially disconnecting refrigerant lines. Condenser coils have delicate aluminum fins that bend easily. DIY pressure-washing often causes more damage than it fixes. Licensed HVAC technicians use foaming coil cleaners, soft brushes, and low-pressure rinses to restore coil surfaces without bending fins or damaging seals.
What to expect: A professional tune-up (covered in the next section) includes both coil cleanings. The technician will remove debris from the outdoor unit, rinse the condenser coil, access the evaporator coil inside the air handler, apply cleaner, and rinse with a condensate pump or drain line. This restores factory airflow and heat-transfer efficiency.
ROI: If your coils are reducing efficiency by 25%, you’re wasting $125 per month on a $500 electric bill. A $200 tune-up that restores full efficiency pays for itself in under two months. Over a four-month cooling season, clean coils save $400–$500 compared to running dirty.
3. Check and Seal Ductwork
Impact: 20–40% of cooled air lost through duct leaks (EPA ENERGY STAR studies) Service required: Professional duct sealing and insulation Typical cost: $500–$1,500 depending on home size; ROI in 1–2 seasons
Most Arizona homes have ductwork running through unconditioned attic spaces where temperatures reach 140–160°F in summer. If those ducts have gaps, disconnected joints, or damaged insulation, you’re pumping expensive cooled air into a superheated attic instead of your living space. The EPA estimates that 20–40% of air moving through duct systems is lost to leaks.
Common duct problems in Arizona homes: Flex duct that’s kinked, crushed, or disconnected at register boots. Sheet-metal joints that have separated due to thermal expansion. Torn or missing duct insulation, causing massive thermal gain as cold air passes through 150°F attic space. Return-air leaks that pull hot attic air into the system, forcing your AC to work harder.
What professional duct sealing involves: A licensed HVAC technician will perform a visual inspection of accessible ductwork, use a duct blaster test to quantify total leakage (measured in CFM at 25 pascals of pressure), seal gaps and joints with mastic sealant or foil-backed tape (never standard duct tape, which fails in heat), and add or replace duct insulation to R-6 or R-8 spec. In severe cases, sections of damaged flex duct are replaced entirely.
ROI example: A typical 2,000-square-foot home with 30% duct leakage is losing $150 per month in wasted cooling during peak season. Professional duct sealing costs $800–$1,200. That investment pays back in 6–8 months of summer use and continues saving $600–$800 per year for the life of the system. Why Summer in Mesa Demands Fast AC Repair explains how duct problems compound during peak-load days, leading to system failures.
4. Verify Refrigerant Charge and Fix Leaks
Impact: 10–20% efficiency drop per 10% refrigerant undercharge Service required: Professional only (EPA Section 608 certification required to handle refrigerant) Typical cost: $200–$600 depending on leak location and refrigerant type
Refrigerant doesn’t “get used up” like gasoline. If your system is low on refrigerant, there’s a leak. Running a system with low refrigerant causes the evaporator coil to freeze (restricting airflow), forces the compressor to work harder (burning more electricity and generating excess heat), and eventually leads to compressor failure.
How low refrigerant kills efficiency: Your AC system is designed to operate at a specific refrigerant pressure and temperature range. When the charge is 10% low, the evaporator coil can’t absorb heat efficiently, so the system runs longer to cool your home. A 20% undercharge can reduce system capacity by 30–40%, meaning your AC is working at less than two-thirds of its rated output while consuming nearly full power.
What a pro does: Using manifold gauges, a licensed technician measures refrigerant pressure on the suction and discharge lines and compares it to manufacturer specs (adjusted for outdoor temperature). If the charge is low, the technician locates the leak using electronic detectors or UV dye, repairs the leak (could be a corroded service valve, a pinhole in the evaporator coil, or a damaged line set), evacuates moisture and air from the system using a vacuum pump, and recharges to the exact factory spec by weight.
Cost breakdown: A simple top-off without leak repair is $150–$250 but solves nothing if the leak remains. Full leak detection, repair, and recharge typically runs $300–$600. If the leak is in the evaporator coil (inside the air handler), repair costs climb to $800–$1,500 because the coil must be replaced. At JLM, we’ve completed over 3,000 installs across the East Valley and maintain an A+ BBB rating. When a refrigerant leak is detected, Bill walks you through the repair-vs-replace decision with transparent pricing and honest advice.
5. Calibrate or Upgrade Your Thermostat
Impact: Programmable/smart thermostats save 10–23% on cooling costs (EPA ENERGY STAR data) Cost: $50–$250 for a quality programmable/smart thermostat; DIY installation or $100–$150 pro install Savings: $50–$115 per month during peak summer (on a $500 bill)
Your thermostat is the brain of your HVAC system. If it’s reading temperature incorrectly or lacks scheduling features, you’re wasting money. Older mechanical thermostats (the round dial type) can drift 3–5 degrees off calibration, causing your system to over-cool or under-cool. Basic digital thermostats without programming force you to manually adjust settings every time you leave the house, which most people forget to do.
Why programmable and smart thermostats save money: A programmable thermostat lets you set a cooling schedule that matches your routine. When you’re at work from 8 a.m. to 5 p.m., the thermostat raises the setpoint to 82–85°F (your AC barely runs). Thirty minutes before you arrive home, it starts cooling back to 78°F so the house is comfortable when you walk in. You save 7–9 hours of unnecessary runtime every weekday without sacrificing comfort.
Smart thermostats (Nest, Ecobee, Honeywell Home) take this further by learning your schedule, adjusting based on weather forecasts, and allowing remote control via smartphone. If you’re stuck late at work, you can delay cooling from your phone instead of cooling an empty house. EPA ENERGY STAR certification for smart thermostats requires proven savings of at least 10% in field studies, with many models achieving 15–23% reductions.
DIY vs. pro installation: If your existing thermostat uses standard 18–24V wiring (most central AC systems do) and you’re comfortable with basic wiring (matching color-coded wires to labeled terminals), DIY installation is straightforward. Most smart thermostats include photo-based setup guides. If your system uses unusual wiring (heat pump, multi-stage, zone control), hire a pro. JLM offers thermostat installation and calibration as part of our comprehensive service lineup.
ROI: A $150 smart thermostat that saves 15% on a $500 monthly summer bill saves $75 per month. Over a four-month cooling season, that’s $300 in savings, paying for the thermostat twice over in year one.
6. Inspect and Lubricate Blower Motor, Fan Belts
Impact: Prevents premature motor failure and improves airflow efficiency Service required: Professional (included in annual tune-up) Cost: Minimal when part of tune-up; standalone motor replacement $300–$800 if failure occurs
Your blower motor is responsible for moving air across the evaporator coil and through your duct system. If the motor bearings are dry or the fan belt (on older belt-drive systems) is loose or cracked, airflow drops and the motor draws more current, wasting electricity and increasing the risk of failure.
What a pro checks: During an annual tune-up, the technician inspects the blower motor for unusual noise, checks amperage draw against the nameplate rating, lubricates motor bearings (on models with oil ports), and inspects the blower wheel for dust buildup that causes imbalance. On belt-drive systems, the tech checks belt tension and wear, replacing the belt if cracked or glazed.
Why this matters: A blower motor running 15% over its rated amperage due to worn bearings consumes an extra 50–75 watts continuously. Over a four-month cooling season running 20 hours per day, that’s 120–180 kWh wasted, or $15–$25 at typical East Valley electric rates. More importantly, a motor that fails mid-summer means no cooling until it’s replaced, often requiring emergency service. Routine inspection and lubrication extend motor life from 10–12 years to 15–18 years.
What a Professional AC Tune-Up Includes (and What It Costs)
You’ve seen the individual tasks that matter. Now let’s talk about what you get when you schedule a professional tune-up and what it should cost in the East Valley.
The Standard 50-Point Inspection Checklist
A legitimate AC tune-up is not a 15-minute visual check. It’s a systematic inspection and cleaning of every component that affects efficiency, safety, and reliability. Here’s what’s included in JLM’s tune-up service (and what you should expect from any reputable HVAC contractor):
Electrical components: Inspect and tighten all electrical connections, test capacitors (start and run capacitors lose capacity over time, causing hard starts and motor failures), measure voltage and amperage at the contactor and compressor, check for signs of arcing or overheating, verify safety disconnect operation.
Refrigerant system: Measure refrigerant pressures (suction and discharge), compare to manufacturer spec adjusted for outdoor temperature, check for refrigerant leaks using electronic detector, inspect refrigerant lines for insulation damage or kinks, verify superheat and subcooling (advanced refrigerant diagnostics).
Airflow and heat transfer: Inspect and clean evaporator coil, inspect and clean condenser coil, measure airflow at supply registers using an anemometer (target 400 CFM per ton of cooling capacity), check blower motor operation and amperage draw, inspect and clean blower wheel.
Condensate drain system: Flush condensate drain line with algaecide to prevent clogs, check drain pan for standing water or rust, verify drain line slope and outlet location, test float switch (if equipped) to prevent overflow.
Thermostat and controls: Verify thermostat calibration using a separate thermometer, test heating and cooling modes, check for proper cycling and setpoint accuracy, inspect wiring and batteries (on battery-powered models).
Safety controls: Test high-pressure cutout switch (prevents compressor damage), verify low-pressure switch operation, check crankcase heater (if equipped), inspect for proper grounding and bonding.
Physical condition: Inspect refrigerant line insulation, check compressor and fan motor mounts for vibration damage, verify unit is level (unlevel outdoor units cause compressor oil migration and premature failure), clear debris and vegetation from outdoor unit (minimum 2-foot clearance all sides).
This is the checklist Bill and his team follow on every tune-up. The process typically takes 60–90 minutes for a standard residential system. At JLM, we’ve completed over 3,000 installs and service calls across Gilbert, Queen Creek, and the East Valley. Our A+ BBB rating reflects the thoroughness and transparency we bring to every job.
Tune-Up Pricing in the East Valley
Typical range: $150–$300 for a complete tune-up
Pricing varies based on system size, accessibility, and whether you’re scheduling during off-peak season (spring, fall) or peak demand (June–August). Most reputable contractors charge $175–$250 for a standard single-system tune-up. If you have a heat pump or mini-split system, expect to pay slightly more due to the additional complexity. Smart Heat Pump Maintenance For Energy Savings explains the differences in heat pump service.
Red flags to watch for: Beware of “free tune-up” or “$49 tune-up” offers. These are almost always loss-leader marketing designed to get a technician into your home to upsell a system replacement or expensive add-on services. The tech performs a cursory inspection, then tells you your system is “dangerous” or “inefficient” and pressures you into a $10,000+ replacement. Legitimate tune-ups cost money because they take time and require skilled labor.
ROI on annual maintenance: A $200 tune-up that restores 15–20% efficiency saves $75–$100 per month during the cooling season. Over four months, that’s $300–$400 in savings, paying for the tune-up and putting money back in your pocket. Beyond the energy savings, regular maintenance extends system lifespan by 3–5 years. A system that lasts 17 years instead of 12 saves you $11,000 in replacement cost. The $200 annual investment is the best deal in home maintenance.
When to Schedule Your Tune-Up
The best time to schedule AC maintenance is March or April (before the peak cooling season starts but after winter heating season ends). This gives you three advantages: lower demand means better availability and often discounted pricing, any problems discovered can be repaired before you need the system in May, and the technician isn’t rushing between emergency calls in 115°F heat.
If you missed the spring window, schedule as soon as possible. A tune-up in June is still better than running all summer on a system that’s 25% inefficient. JLM offers same-day service availability across Gilbert, Queen Creek, and Apache Junction. The Smart Way to Prep AC for Gilbert’s Hot Summer walks through the ideal pre-season prep timeline.
DIY Maintenance vs. When to Call a Pro
Empowering yourself to handle simple tasks saves money and keeps your system running between professional visits. But HVAC work involves electricity, refrigerant, and high-pressure systems. Knowing where the DIY line stops protects your safety and your wallet.
Safe and Effective DIY Tasks
These tasks require no special tools, no technical training, and carry minimal risk. Every homeowner should be comfortable performing them.
Air filter replacement: We’ve covered this already. Check monthly, replace when dirty. Buy filters in bulk online (6-packs of MERV 8–11 pleated filters) to save money. Write the installation date on the filter frame with a Sharpie so you know when it’s due.
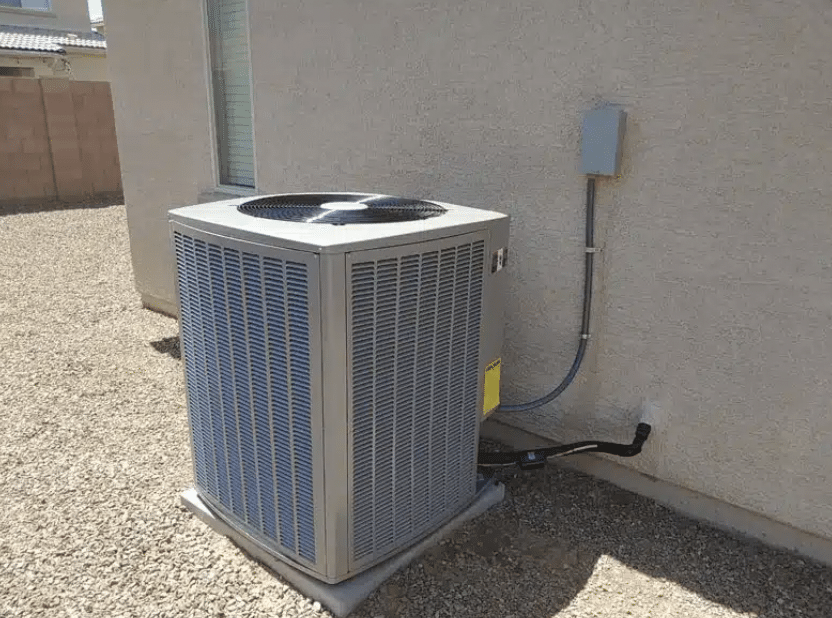
Outdoor unit debris clearing: Turn off power to the outdoor unit at the disconnect box (usually mounted on the wall next to the condenser). Remove leaves, grass clippings, cottonwood seeds, and debris from the top and sides of the unit. Trim back bushes and vegetation to maintain 2-foot clearance all around. Rinse the condenser coil gently with a garden hose (spray from inside-out to push debris out, not in). This 15-minute task every few months prevents major efficiency loss.
Thermostat battery replacement and programming: If your thermostat display is dim or blank, replace the batteries (usually two AA or AAA). Review your programmed schedule at the start of each season. Adjust setpoints to match your actual routine instead of running the old schedule from last year.
Register and vent cleaning: Vacuum or wipe down supply and return vents to remove dust buildup. Make sure furniture, curtains, or boxes aren’t blocking airflow. A blocked return vent restricts airflow as badly as a clogged filter.
Tasks That Require a Licensed HVAC Technician
Do not attempt these tasks yourself. They require EPA certification, specialized tools, and technical training. DIY attempts often cause more damage than they fix, voiding warranties and creating safety hazards.
Refrigerant work: It’s illegal under EPA Section 608 regulations to purchase, handle, or vent refrigerant without certification. Refrigerant is hazardous, expensive, and environmentally regulated. If your system is low on refrigerant, call a licensed HVAC contractor. Attempting to “top off” refrigerant yourself will damage your system and potentially harm you.
Electrical component inspection and repair: HVAC systems operate on 240V circuits that can kill. Capacitors store lethal voltage even when power is off. Contactors, circuit boards, and compressor wiring must be handled by trained professionals with proper tools and safety equipment. Never open electrical panels or touch wiring unless you’re a licensed electrician or HVAC technician.
Coil deep-cleaning with chemical agents: Evaporator coils are inside sealed air handlers and require refrigerant line disconnection to access safely. Condenser coils have delicate aluminum fins that bend or tear easily. Professional-grade coil cleaners are corrosive. Let the pros handle this.
Ductwork sealing and pressure testing: Proper duct sealing requires a blower door test, duct blaster equipment, mastic sealant application, and knowledge of building codes. DIY duct tape and foam board “repairs” usually make leaks worse. Professional duct sealing costs $500–$1,500 but pays back in 1–2 seasons.
Warning Signs You Need Service NOW
Certain symptoms indicate imminent system failure. When you see these, don’t wait for your next scheduled tune-up. Call JLM immediately:
Warm air blowing from vents: Compressor failure, refrigerant leak, or frozen evaporator coil. Your system is running but not cooling.
Ice on refrigerant lines or evaporator coil: Low refrigerant, restricted airflow, or failing expansion valve. Running the system with ice will damage the compressor.
Strange noises (grinding, squealing, banging): Failing blower motor bearings, loose fan blades, or debris in the outdoor unit. These get worse fast and lead to complete failure.
Tripped breaker or won’t start: Electrical problem, bad capacitor, or compressor failure. Don’t keep resetting the breaker. That’s a fire hazard.
Skyrocketing electric bill with no usage change: Major efficiency loss due to refrigerant leak, duct leak, or component failure. The longer you wait, the more money you waste.
JLM offers 24/7 emergency service across the East Valley. When your AC fails on a 112°F Saturday afternoon, we respond fast. Do You Really Need Professional AC Repair in Mesa? helps you distinguish true emergencies from issues that can wait until Monday.
Energy-Saving Habits That Multiply Maintenance ROI
Maintenance restores your system to peak efficiency. Smart operational habits keep it there and amplify your savings. These strategies cost little or nothing but deliver measurable results.
Thermostat Settings and Scheduling
The Lawrence Berkeley National Laboratory published a 2022 study showing that every degree you raise your thermostat setpoint in summer saves approximately 3% on cooling costs. In Arizona, where your AC runs 20+ hours per day, that 3% compounds fast.
The 78°F baseline: Set your thermostat to 78°F when you’re home and awake. This is the temperature most people find comfortable in lightweight clothing with ceiling fans running. Pushing the setpoint lower doesn’t cool your home faster (your AC runs at the same speed regardless). It just makes the system run longer and waste money.
The away setpoint: When you leave for work or an extended errand, raise the setpoint to 82–85°F. Your AC will cycle less frequently, saving runtime and electricity. Program the thermostat to start cooling back down 30–45 minutes before you arrive home so it’s comfortable when you walk in.
Avoid extreme setbacks: Don’t turn the AC completely off when you leave. Allowing your home to reach 95°F+ in Arizona heat means the system has to run for hours to cool back down, and you’re fighting the thermal mass of superheated walls, floors, and furniture. A moderate setback to 82–85°F saves energy without creating a recovery penalty.
Night setpoint: Many people sleep comfortably at 75–76°F with a ceiling fan. Lowering the setpoint at night saves $15–$25 per month compared to running 72°F around the clock.
Managing Airflow and Zoning
Your HVAC system is designed to circulate a specific volume of air through the entire duct system. Manipulating airflow can save energy, but only if done correctly.
Close vents in unused rooms (with caution): Closing 1–2 vents in rarely used bedrooms or a formal dining room can redirect cooled air to high-traffic areas and reduce the total volume your system has to condition. However, closing more than 20% of your vents increases static pressure in the duct system, which strains the blower motor and reduces efficiency. Don’t close half your vents thinking you’ll save money. You’ll damage your system.
Ceiling fans improve comfort without lowering the thermostat: A ceiling fan uses 10–50 watts and creates wind-chill effect that makes a room feel 3–4 degrees cooler. Running ceiling fans in occupied rooms lets you set the thermostat 2–3 degrees higher without sacrificing comfort. Over a four-month season, that’s $60–$100 in savings for $5 in fan electricity.
Consider a zoning system for multi-story or large homes: If you have a two-story home where the upstairs is always hotter than the downstairs, a zoned HVAC system with dampers and multiple thermostats can save 20–30% on cooling costs by conditioning only the zones you’re using. Zoning retrofit costs $2,000–$4,000 but pays back in 3–5 years on large homes. How Mini Split Installation Works from Start to Finish explains another zoning option using ductless mini-splits for problem areas.
Insulation, Window Treatments, and Shade
Every BTU of heat you block from entering your home is a BTU your AC doesn’t have to remove. Passive cooling strategies compound maintenance savings.
Blackout curtains and reflective window film: West-facing windows in Arizona homes can gain 500–1,000 BTUs per hour per square foot of glass in late afternoon sun. Blackout curtains or cellular shades reduce that gain by 60–80%. Reflective window film (low-e or solar control film) blocks 50–70% of heat gain while maintaining visibility. A $200 investment in window treatments for south and west windows saves $30–$50 per month in peak summer.
Attic insulation: Arizona building code requires R-30 to R-38 attic insulation, but many older homes have R-19 or less. Upgrading attic insulation to R-38 costs $1.50–$3.00 per square foot ($1,500–$3,000 for a typical home) and reduces cooling load by 15–25%. Payback period is 3–5 years.
Outdoor shade structures: Ramadas, shade sails, or mature trees on south and west exposures reduce heat gain on exterior walls and windows. A well-placed palo verde or mesquite tree can lower afternoon temperatures on a west wall by 10–15°F, reducing AC load by 200–500 watts. Plant desert-adapted shade trees now; they’ll pay dividends for decades.
How to Know When Maintenance Isn’t Enough (System Replacement Signals)
Maintenance extends lifespan and improves efficiency, but no system lasts forever. Knowing when to repair and when to replace saves you from throwing good money after bad.
Age, Efficiency Rating, and Repair Cost Thresholds
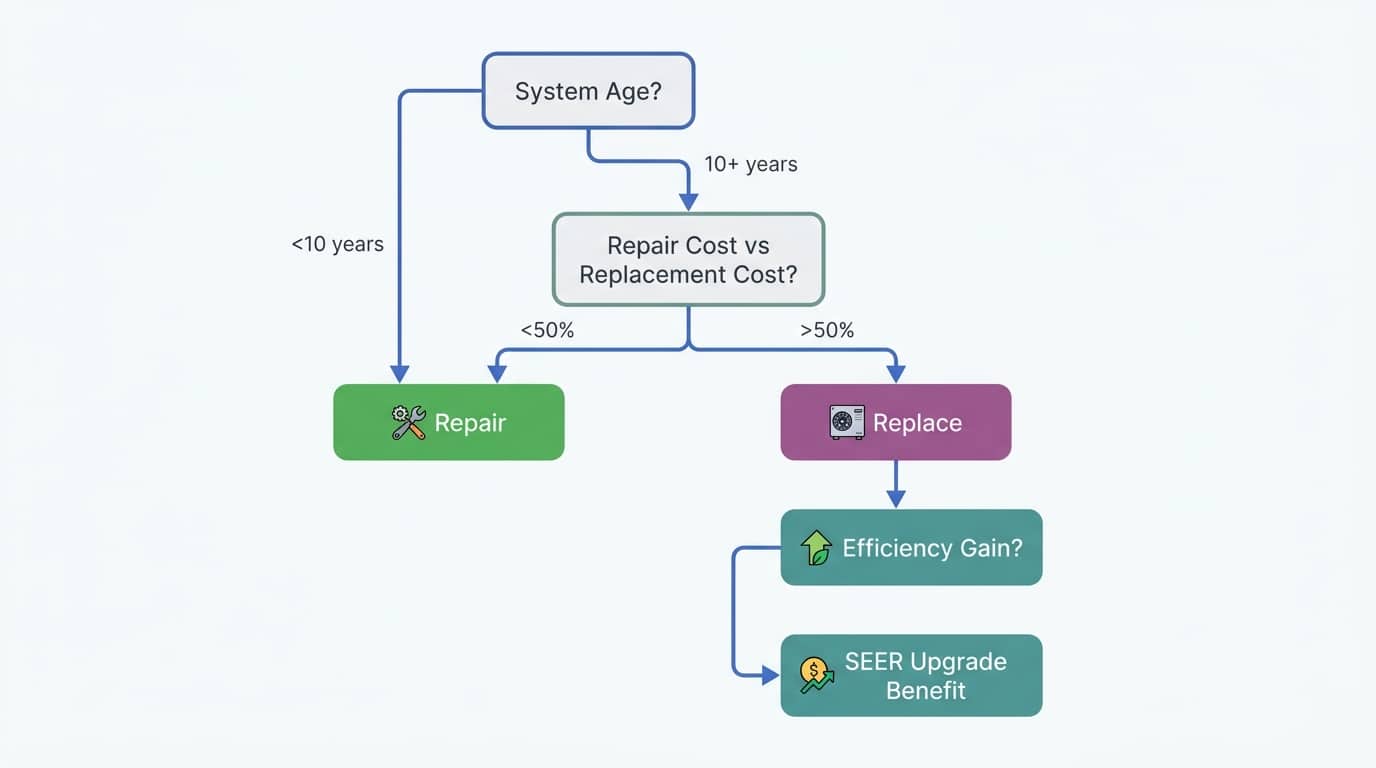
The average lifespan of a central AC system in Arizona is 12–15 years with regular maintenance, slightly shorter than the 15–20-year national average due to extreme heat and continuous runtime. When your system reaches 10–12 years old, start evaluating repair-vs-replace on a cost-benefit basis.
The SEER rating gap: Older systems (pre-2006) typically have SEER ratings of 10–13. Modern high-efficiency systems are 16–20+ SEER. A 16 SEER system uses 23–37% less electricity than a 10–13 SEER system to deliver the same cooling. If your 13-year-old 10 SEER system is costing you $600 per month to run in summer, a new 18 SEER system would drop that to $400–$450 per month, saving $150–$200 per month during peak season.
The $5,000 rule: If a repair costs more than 50% of the replacement cost and your system is 10+ years old, replacement often makes financial sense. Example: a compressor replacement costs $2,500–$4,000. A full system replacement costs $8,000–$12,000. If your system is 12 years old and needs a $3,500 compressor, you’re spending 35% of replacement cost on a component that will still be attached to a 12-year-old air handler, coil, and ductwork. The compressor might last 5 more years, but other components will start failing soon. Replacement gives you a fresh 10-year warranty and 30%+ efficiency improvement.
Frequent repairs: If you’re calling for service 3–4 times per year and spending $500–$1,000 annually on repairs, you’re paying for a failing system’s decline. Those repair dollars could be going toward a new system payment instead.
Calculating Payback on a New High-Efficiency System
Let’s run the numbers on a real-world example.
Scenario: 2,000-square-foot home in Gilbert with a 14-year-old 10 SEER AC system. Summer electric bills average $580 per month (June–September). System needs a $3,200 compressor replacement.
Option A (repair): Pay $3,200 for a new compressor. Keep the old system running at 10 SEER efficiency for an estimated 3–5 more years. Continue paying $580/month in summer. No efficiency gain.
Option B (replace): Install a new 17 SEER Amana system for $11,000. New system uses 41% less electricity than old 10 SEER system. Summer bills drop to $340–$380 per month (saving $200–$240 per month, or $800–$960 per season). New system comes with 10-year parts warranty and 10-year labor warranty.
Payback calculation: Net cost of replacement: $11,000 minus $3,200 avoided repair = $7,800 incremental investment. Annual savings: $800–$960 per cooling season. Payback period: 8–10 years if you only count cooling-season savings. Lifetime savings over 15 years: $12,000–$14,000 in avoided energy costs plus avoided repair costs on an aging system.
At JLM, Bill walks you through this analysis with transparent pricing and no pressure. We’ve completed over 3,000 installs using premium Amana equipment. If a tune-up solves your problem, that’s what we recommend. If your system is genuinely at end-of-life, we’ll show you the numbers so you can decide what’s right for your budget and timeline. Mini Split Installation in Gilbert AZ: What to Know First covers another option for homes where a full system replacement isn’t practical.
Conclusion
Lowering your HVAC bill in Arizona’s brutal summer heat isn’t about suffering through 85°F indoor temperatures or replacing a working system. It’s about maintenance, smart habits, and knowing when to invest in upgrades that pay for themselves.
The six high-impact maintenance tasks (filter changes, coil cleaning, duct sealing, refrigerant verification, thermostat calibration, and blower motor care) deliver 15–30% efficiency gains that translate to $400–$800 in savings per cooling season. Pair those with disciplined thermostat settings, strategic airflow management, and passive cooling strategies, and you’re looking at $1,000+ in annual savings without sacrificing comfort.
Regular maintenance also extends your system’s lifespan by 3–5 years, saving you $11,000 in premature replacement costs. A $200 annual tune-up is the best investment in your home’s mechanical systems.
At JLM Air Conditioning & Heating, we’ve built our reputation on honest, transparent service. We don’t upsell unnecessary replacements. If your system can be fixed, Bill will fix it. If replacement makes financial sense, he’ll walk you through the numbers so you can decide. Over 3,000 installs, an A+ BBB rating, and hundreds of five-star reviews reflect our commitment to doing the job right the first time.
Don’t wait until your AC fails on the hottest day of the year. Schedule your tune-up now and take control of your summer cooling costs.
Ready to cut your cooling costs this summer? Schedule your AC tune-up with JLM Air Conditioning & Heating today. Call now: 602-619-3609 or request a free consultation online. Family-owned, honest pricing, same-day service available across Gilbert, Queen Creek, and the East Valley.
For more HVAC tips and seasonal maintenance guides, visit our Blog | HVAC Tips & Updates for Gilbert, AZ Residents and explore our full range of Air Conditioning | AC Technician Near Me and HVAC System | AC Technician Near Me resources.